Create a nostalgic reminder of a fun weekend
Poring over a map is a sure-fire way to ramp up the anticipation for a long weekend away (and with two in May, there are plenty of opportunities). There’s the road trip to navigate, the B&B to locate, the nearest stretch of beach to find, and day trips to plan. And, even better, when you get back home, that same map will remind you of where you have been: retrace your steps up contours to that spectacular viewpoint or along the dotted lines of a coastal footpath to the beach cafe.
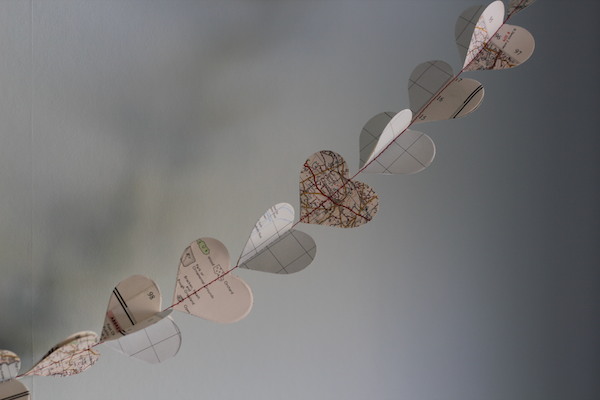
One way to remember a journey is simply to frame a map of the area travelled. Bring it alive with pins marking memorable places visited or by adding snapshots of special meals or locations. Alternatively, scour local charity shops' book sections where there is often a bucket or basket of old maps waiting to be snapped up and recycled, and turn them into this simple but pretty paper garland to hang in your hall, above your bed or whatever spot in your home could do with an injection of bank holiday nostalgia once May is over.
What you’ll need
One or two vintage maps (depending on preferred length of garland)
A craft cutter (we used a 2-inch heart cutter but you could use a similar-size circular cutter)
Glue stick
Sewing machine and thread
A felt ball or bead (to weight the garland at the bottom)
How to make your garland
1. If your map is one-sided, cut it in half and glue the 'wrong' sides together with the glue stick. Make sure that both sides of the map are the right way up. Allow to dry for a couple of minutes.
2. Using your craft cutter, cut out the hearts. You may find it easier to cut the map into strips first.
3. Leave a good length of thread at the top, and sew your hearts together with the sewing machine. To make your garland 3-D, sew the hearts in pairs. A contrasting red thread will bring out the detail in the map. (When lining up the next heart, have the foot and the needle of your machine down so that you can use the needle as a guide to get the heart in the right place each time.)
4. Keep going until the garland is your desired length. Leave a good length of thread at the end and hand-stitch a little felt ball to add weight and help it hang straight. Tie a loop or knot at the top of the garland so that you have something to hang the garland form.
5. Open the hearts to create a 3-D effect. Hang or drape your garland.
Created by Charlie Deighton and first published here in June 2014.
See more of her work at her Etsy shop, or follow her on instagram.
Get hold of your copy of this month's The Simple Things - buy, download or subscribe


