The Simple Things

Taking time to live well
  • Home
  • Subscribe
  • SHOP
  • Newsletter
  • About
  • Work with us
  • Home
  • Subscribe
  • SHOP
  • Newsletter
  • About
  • Work with us

Blog

Taking Time to Live Well

  • All
  • Chalkboard
  • Christmas
  • Competition
  • could do
  • Eating
  • Escape
  • Escaping
  • Fresh
  • Fun
  • gardening
  • Gathered
  • Gathering
  • Growing
  • Haikus
  • Interview
  • Living
  • Looking back
  • Magazine
  • magical creatures
  • Making
  • Miscellany
  • My Neighbourhood
  • Nature
  • Nest
  • Nesting
  • outing
  • playlist
  • Reader event
  • Reader offer
  • Shop
  • Sponsored post
  • Sunday Best
  • Think
  • Uncategorized
  • Wellbeing
  • Wisdom

Project | Satin Stitch Patching

David Parker March 20, 2025

Learn a clever stitching technique that will give old clothes a new lease of life

Mending is officially good for you. Not only does it make you feel useful and give you the warm glow of knowing you’ve saved something from landfill, but it also lets you make an item of clothing unique with visible mending that brings character to everyday items. A mended item becomes even more beautiful and loved than before it had flaws.

Satin stitch patching

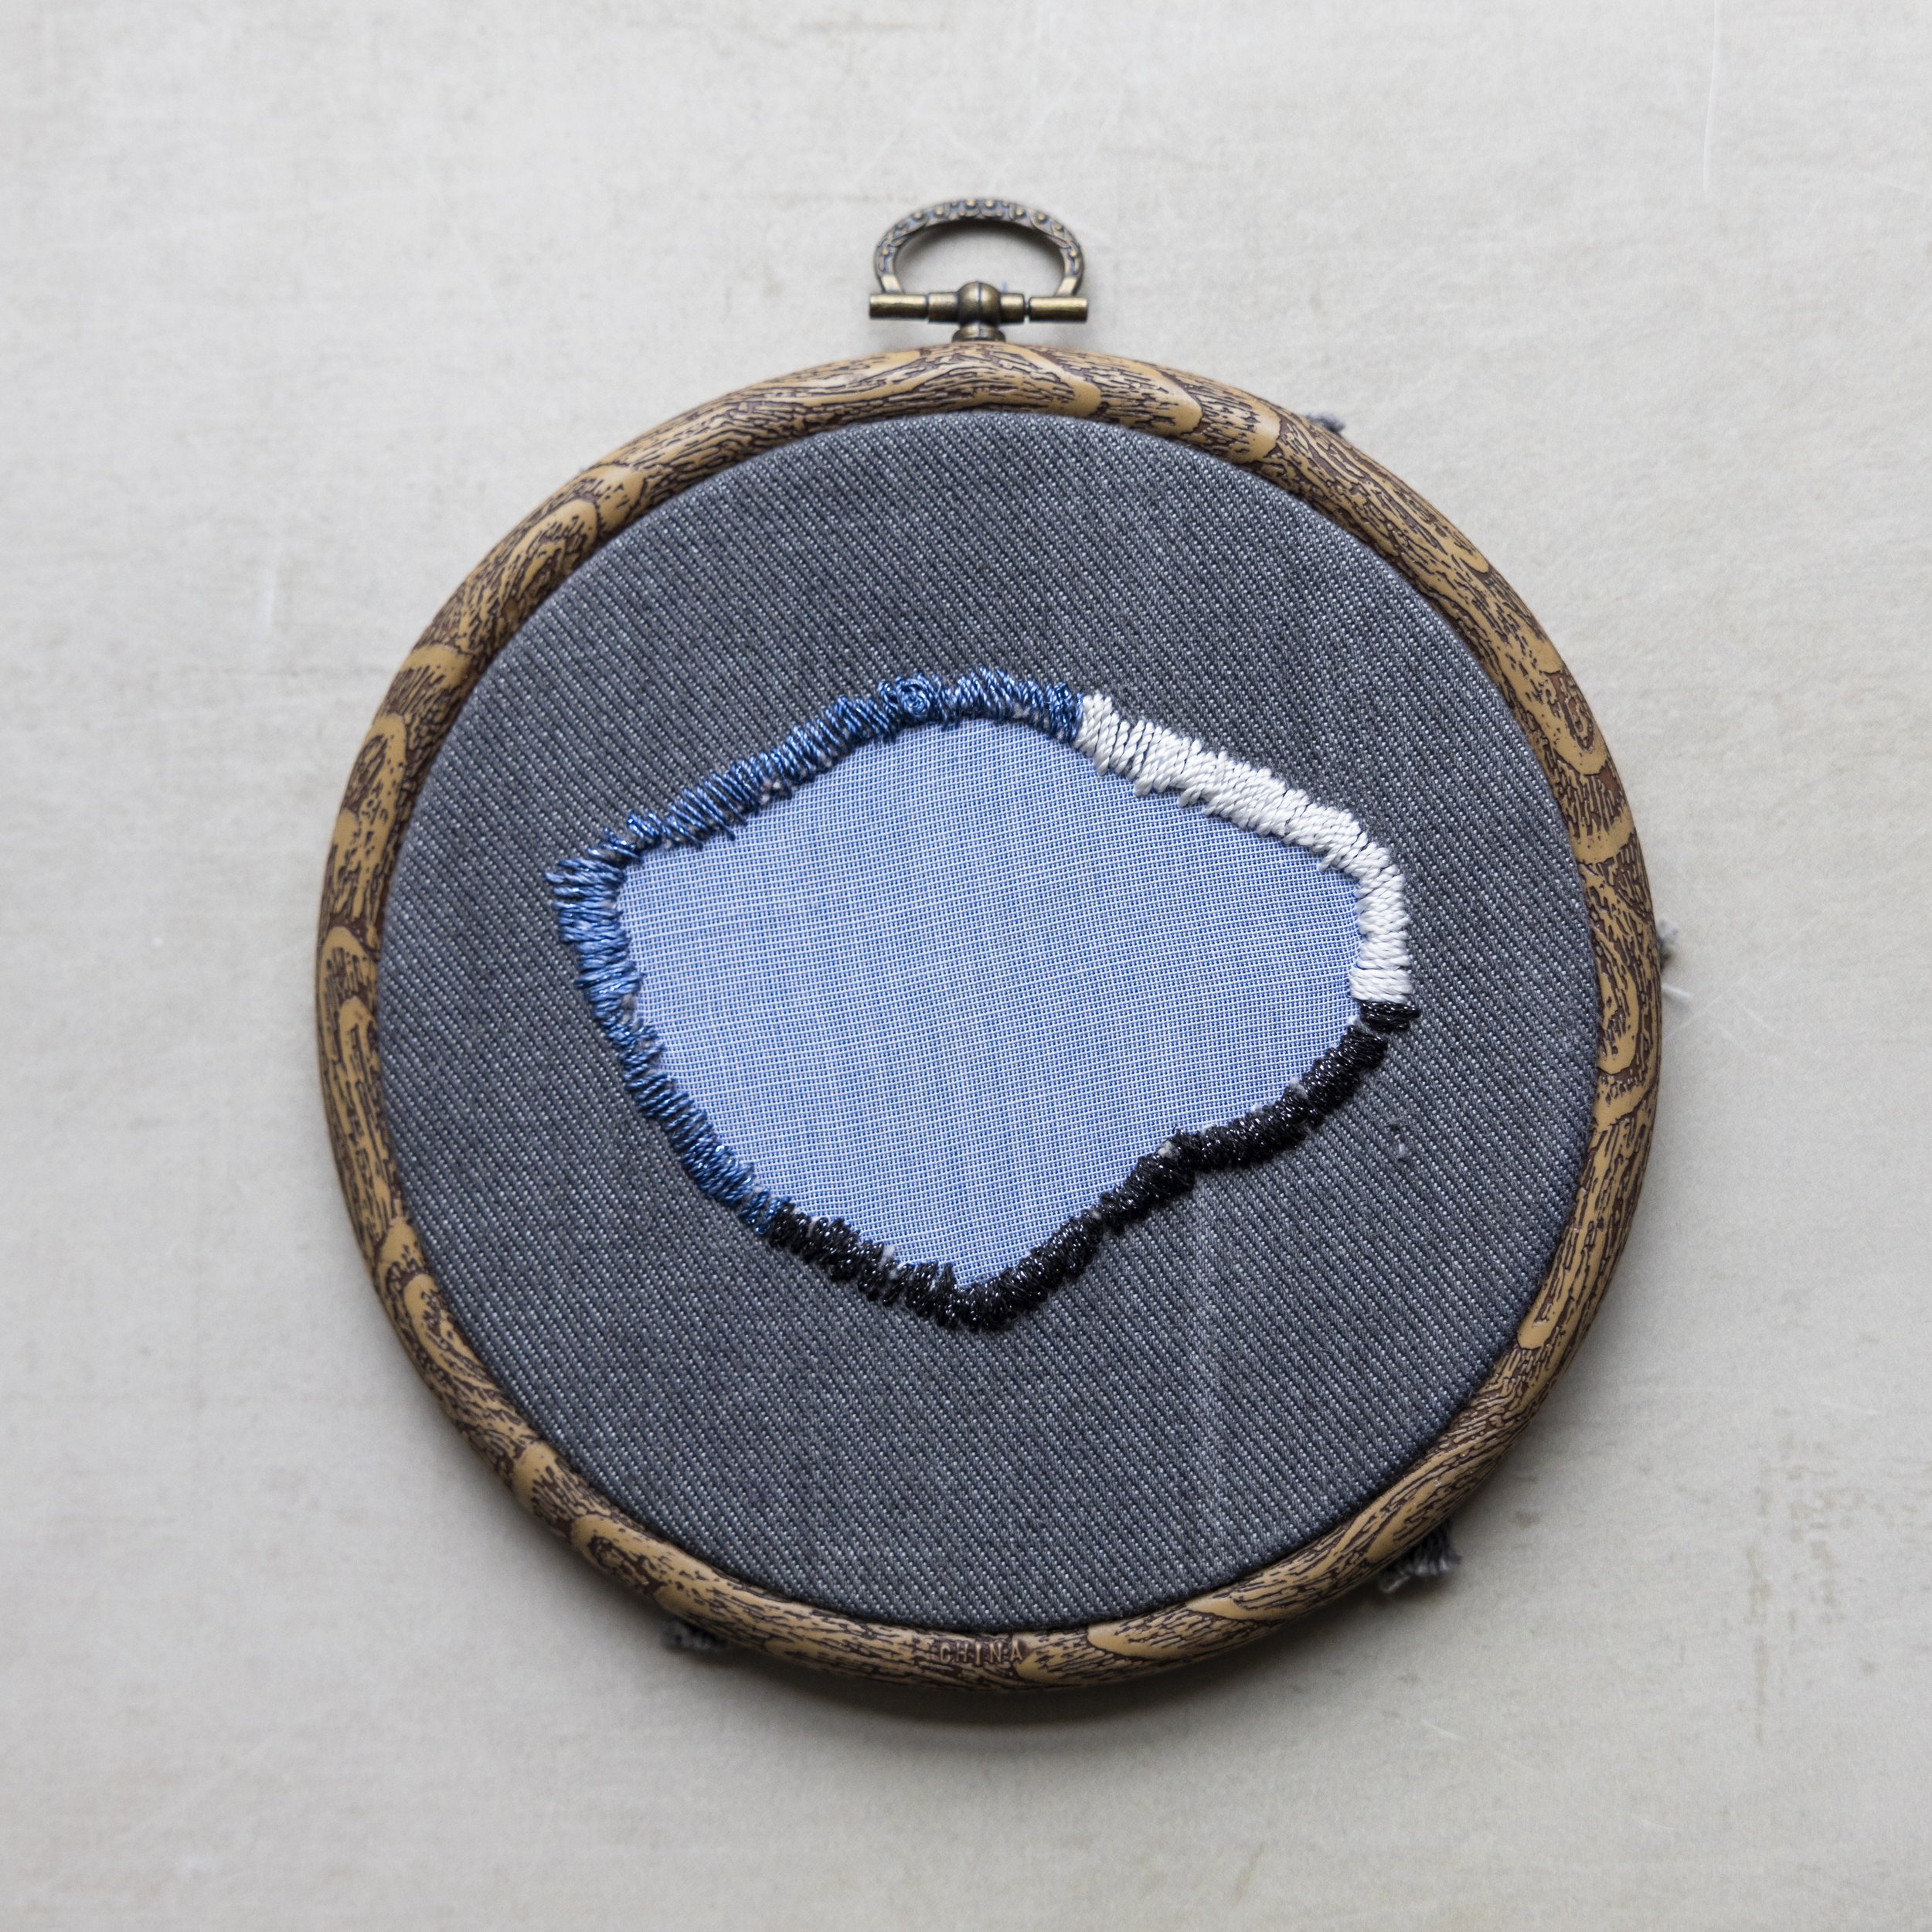
Satin stitch is a great way to make a feature out of a mend and this works particularly well on fabrics like denim It’s used to patch the fabric hole to reinforce the mend and stop it getting any bigger. Traditionally, cotton threads are used, but it can also work nicely with silk threads.

1 Select a piece of scrap fabric large enough to patch the hole in the garment – you can always trim it later. Any woven fabric will work, just make sure it has the same density as the garment you want to repair. Next, you may want to make the hole a bit more interesting – take a fabric pen and draw a shape around the hole and trim to the new shape you’ve drawn.

2 Pin your patch to the inside of the garment so the hole is covered. Be generous with pinning – you don’t want the fabric patch to move about while you’re stitching. Pin around 0.5cm from the edge of the hole.

3 Thread your needle (use an arm’s length), leaving a tail by the eye end so the thread doesn’t come out. Then tie a couple of knots at the opposite end of the thread.

4 To start your satin stitch, come through the back of the fabric at the very edge of where the hole is in the garment. Bring your needle all the way through until the knot meets the fabric. You’ll then put the needle back into the fabric from the front, positioning your needle about 5mm directly below where you brought the needle out. Next, bring the needle through the back again (almost back through the first hole in the first stitch, so the stitches are super close to one another), and then through the front, again super close to the previous stitch. Continue in this way until you come to the end of your thread and are ready to thread the needle again.

5 When tying off your thread, you’ll need to leave at least 10cm of thread to make it secure. Bring your needle through to the back, through the stitch that’s closest to where the needle is coming from. Pull the needle through about 1 cm and wrap the thread around a couple of times and pull through. This creates the knot. I like to then weave the needle under the next two stitches and repeat this process one more time to make sure the thread won’t come loose when washed. You can then take your scissors and snip really close to the garment.

6 Continue with a new piece of thread ensuring that your stitches are super compact – much like satin fabric – going all the way around the hole until you meet your starting point. Tie off your work, and give it a press to make sure the fabric is laying flat. You’re now ready to wear.

This is just one of the projects from mending expert Hannah Porter who put together our March issue’s Home Economics pages. To find out more about Hannah’s work, workshops and kits visit: restorationldn.com.

Buy this month's The Simple Things - buy, download or subscribe

More from our March issue…

Featured
Mothers Wisdom.jpeg
Mar 27, 2025
Wisdom | Mother Knows Best
Mar 27, 2025
Mar 27, 2025
@the.narrows.project 2.jpeg
Mar 22, 2025
Outing | Music Rooms
Mar 22, 2025
Mar 22, 2025
Nettle crisps.jpg
Mar 15, 2025
Recipe | Salt & Vinegar Nettle Crisps
Mar 15, 2025
Mar 15, 2025

More sewing solutions…

Featured
Mending.jpeg
Mar 20, 2025
Project | Satin Stitch Patching
Mar 20, 2025
Mar 20, 2025
Screenshot 2025-02-14 at 11.15.57.png
Feb 18, 2025
Playlist | All apologies
Feb 18, 2025
Feb 18, 2025
Lavender eye pillow.jpg
Jul 22, 2023
Make | A Soothing Lavender Eye Pillow
Jul 22, 2023
Jul 22, 2023
In Making Tags mending, sewing, patch
Comment

Illustration by Christina Carpenter

Make | A Jam Jar Garden

Iona Bower February 2, 2025

You’ll need:
Glass Mason jars or ordinary jam jars; a bag of hyacinth bulbs; a bag of gravel.

To make:
1 Give the jars a good clean and dry, then add gravel up to the shoulders of each jar.

2 Fill with water to above the top of the gravel in each one and place a hyacinth bulb on top of each jar.

3 You’ll need to keep the water topped up as the bulbs sprout. Just gently move the bulbs to one side and top up with a jug.

4 Gather all your hyacinth jars together on an old tray, in a small wooden crate or any other receptacle to make a centrepiece for a dining or coffee table, or simply line them up on a windowsill, or anywhere that catches your eye and create your own indoor jam jar garden to remind you that spring is just around the corner.

This is just one of the ideas for things to note and notice, plan and do from our Almanac pages. Find more seasonal inspiration in the February issue, in shops now or available to order from our online store.

Buy this month's The Simple Things - buy, download or subscribe
More from our Almanac pages…

Featured
Screenshot 2025-01-18 at 11.57.28.png
Feb 2, 2025
Make | A Jam Jar Garden
Feb 2, 2025
Feb 2, 2025
Spring Wisdom.jpeg
Jan 1, 2025
Almanac | A simple, seasonal idea for every month
Jan 1, 2025
Jan 1, 2025
Beetle Bucket.jpg
Aug 20, 2024
Make | A Beetle Bucket
Aug 20, 2024
Aug 20, 2024

More from our blog…

Featured
Broad beans.jpeg
May 10, 2025
Recipe | Spring Beans on Toast
May 10, 2025
May 10, 2025
saad-chaudhry-7vyTHevoeJM-unsplash.jpeg
May 8, 2025
Sponsored Post | Holidays with Peace of Mind
May 8, 2025
May 8, 2025
Guernsey The Grandmother, a neolithic statue at St Martins church, is often bedecked with floral tributes..jpeg
May 6, 2025
Folklore | Guernsey Superstitions
May 6, 2025
May 6, 2025
In Making Tags issue 152, almanac, January, indoor gardening, bulbs, houseplant
Comment

Illustration by Kavel Rafferty

How to | Make a Tea Cosy from an Old Jumper

Iona Bower January 25, 2025

Turn an old jumper into a tea cosy with this simple make project

You will need:

Old jumper(s) with high wool content

Cloth bag or old pillowcase

Pen and paper

Scissors

Pins

Sewing machine, or needle and thread

How to make:

1 Put the jumper in a cloth bag or an old pillowcase into your washing machine on a hot setting. This may seem wrong, but it’ll help it felt, making it easy to sew.

2 Take your (empty) teapot and lay it on its side on the paper. Draw a semi-circle over the top to roughly work out the size of your cosy. Neaten up the curve so it’s symmetrical. Add on 1cm all around the curved edge as your seam, and cut out to act as a template.

3 Once your jumper is dry, pin on your template. Position so the bottom ribbing of the jumper can double at the bottom edge of the cosy. Cut out a piece for the front and back.

4 Pin the two pieces together, with the sides you want on the cosy’s outside facing in, towards each other. Leaving the bottom open, sew around your 1cm seam allowance. If you’re on a machine, you can zigzag stitch the raw edges together.

5 Remove pins and turn right way out. You could use leftover scraps for mittens or slippers (see TST149), and enjoy your supply of warm tea.

This project is taken from our January Miscellany pages, where you’ll find facts and fun to interest you each month.

More simple make projects…

Featured
Chalkboard tray.jpg
Jun 23, 2024
Make | A Chalk Board Serving Tray
Jun 23, 2024
Jun 23, 2024
Lavender eye pillow.jpg
Jul 22, 2023
Make | A Soothing Lavender Eye Pillow
Jul 22, 2023
Jul 22, 2023
Modern Crochet Style PAGES2.PRESS 60.jpg
Apr 19, 2023
Weekend Project | Crocheted fruit placemats
Apr 19, 2023
Apr 19, 2023

More from our January issue…

Featured
Beira Queen of Winter.jpeg
Jan 28, 2025
Folklore | Beira Queen of Winter
Jan 28, 2025
Jan 28, 2025
TEA COSY JUMPER.jpg
Jan 25, 2025
How to | Make a Tea Cosy from an Old Jumper
Jan 25, 2025
Jan 25, 2025
Spelt cookies.jpg
Jan 18, 2025
Recipe | Chocolate, Bay Leaf and Spelt Oat Cookies
Jan 18, 2025
Jan 18, 2025
In Making Tags issue 151, January, make, project, tea
Comment

Photography by Emma Croman

Make | Tin Can Panettone

Iona Bower November 30, 2024

Panettone baked in tin cans makes them just the right size for a gift – if there are any left!

Makes 8

325g mixed dried fruit
1 orange, zested and juiced
500g plain flour, plus extra for dusting
½ tsp salt
100g caster sugar
14g easy bake yeast
200ml milk, plus 2 tbsp for brushing
3 eggs
1 tsp vanilla extract
1 lemon, zested
200g very soft butter, plus 1 tsp, melted, and extra, melted, to grease 8 x empty 400g cans, washed and dried, paper labels removed

1 Place the dried mixed fruit and the orange zest in a bowl, then stir in 1 tablespoon of the juice. Leave to steep while you make the dough.

2 Sift the flour, salt, sugar and yeast into a large bowl or the bowl of a stand mixer. Warm the milk gently in a small pan, then pour into a jug and beat in the eggs, vanilla extract and lemon zest with a fork.

3 Gradually mix the milky mixture into the dry ingredients using a wooden spoon or the dough hook attachment of your mixer and beat gently, or on a low speed, for 10 mins to form a smooth and silky dough.

4 Next, beat in the butter, a small knob at a time, making sure it has been absorbed into the dough before adding the next piece. Tip in the orange-soaked fruit and work it into the dough. Cover and leave somewhere warm for about 1 hr, or until it has doubled in size.

5 Meanwhile, prepare the tin cans by brushing the inside with a little melted butter and lining the sides and base with baking paper, being sure to leave some paper sticking out the tin.

6 When your dough is ready, knock the excess air out of it with your wooden spoon or the dough hook attachment for about 1 min.

7 Tip out the dough onto a lightly floured work surface and cut into eight 8 evenly-sized pieces. It will be very soft so don’t bother trying to knead it. Drop a piece of dough into each of the cans, cover with a clean tea towel and leave somewhere warm for another hour or so, so that the dough can rise some more. Meanwhile, preheat the oven to 190C/Fan 170C/ Gas 5.

8 When ready, put the cans onto a baking sheet and bake in the centre of the oven for 25-30 mins, or until golden brown. Remove, leave to cool for a few minutes, then carefully slide them out of the cans. Remove the baking paper and brush the top of each panettone with a little melted butter, then leave to cool on a wire rack. Wrap them in cellophane or brown paper and label.

Cook’s note: These will last 3-4 days if stored somewhere cool.

These Tin Can Panettones are one of the ideas for a Christmas Hamper from our December issue. There are also instructions to make Orange Curd, Winter Berry Granola, DIY Mulled Wine, Furoshimi Wrapping and Chocolate, Orange and Walnut Bark. The recipes are by Louise Gorrod and the photograpny by Emma Croman.

Buy this month's The Simple Things buy, download or subscribe

More festive makes…

Featured
My Plot wreath.JPG
Dec 3, 2024
Christmas | Making wreaths
Dec 3, 2024
Dec 3, 2024
135_PaperStars.jpg
Dec 12, 2023
Make | Painted Paper Stars
Dec 12, 2023
Dec 12, 2023
Kay Prestney candles.jpg
Nov 18, 2023
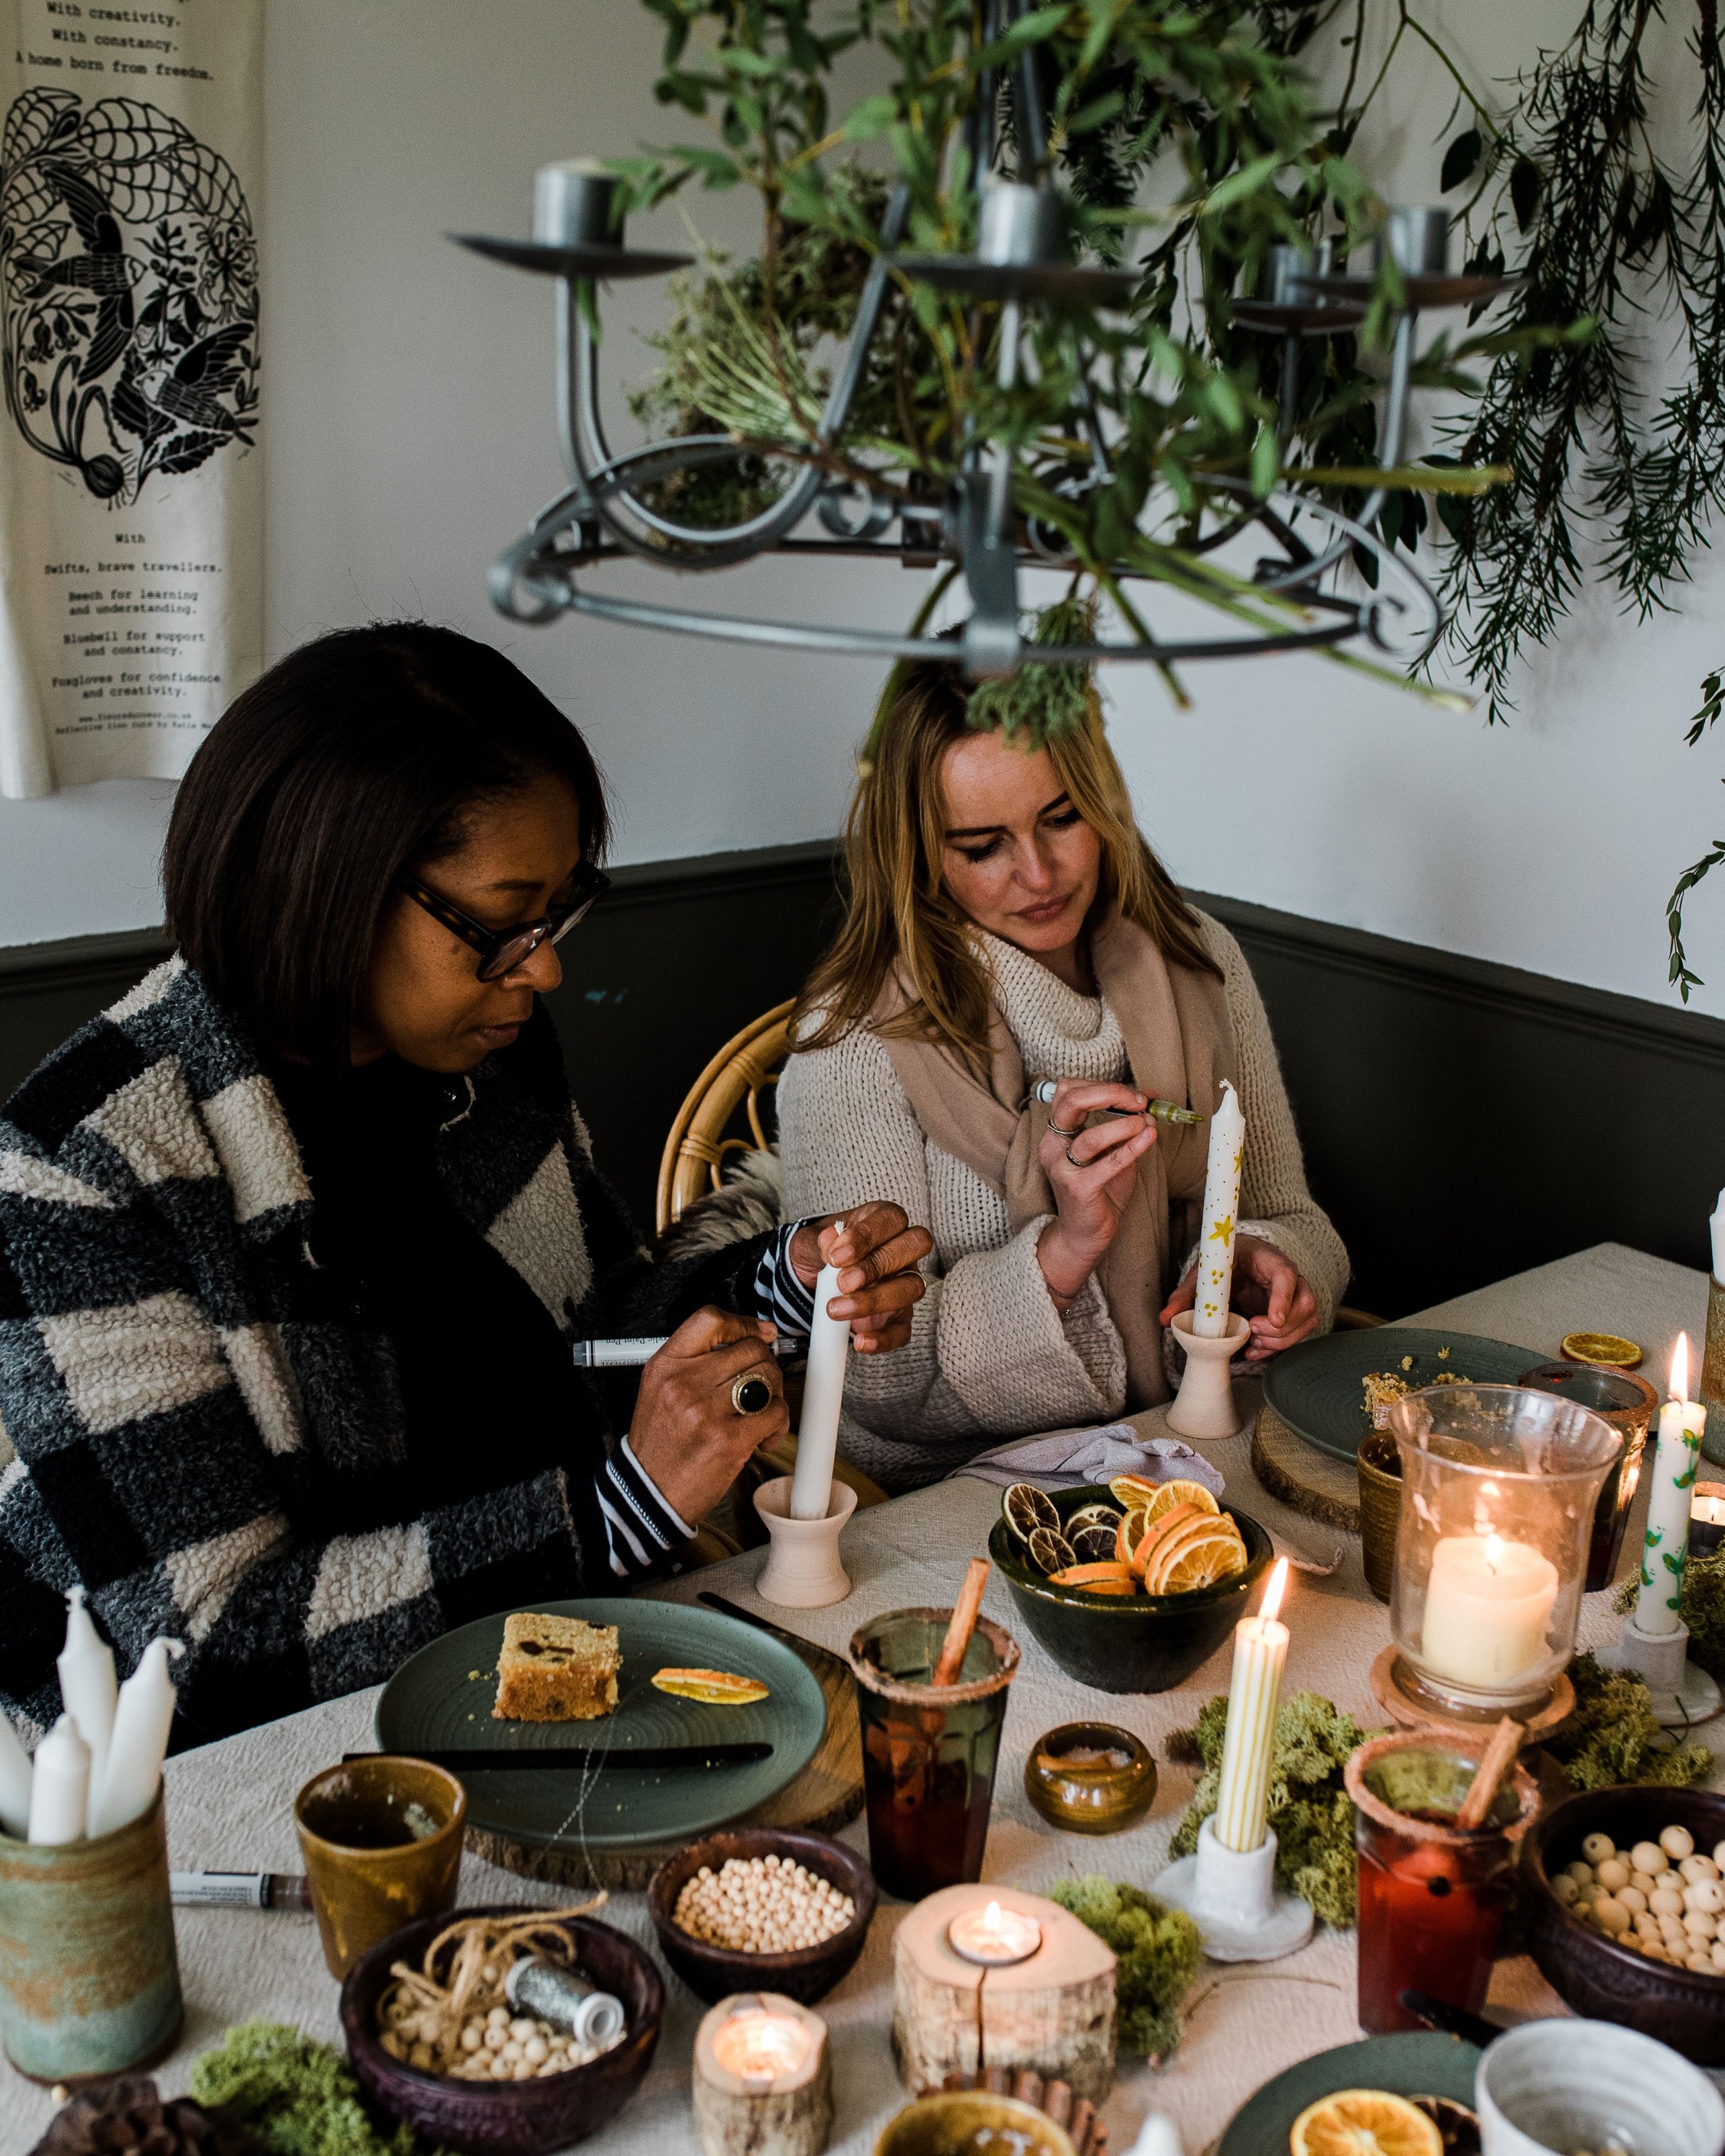
Project | Paint Your Own Candles
Nov 18, 2023
Nov 18, 2023

More from our blog…

Featured
Broad beans.jpeg
May 10, 2025
Recipe | Spring Beans on Toast
May 10, 2025
May 10, 2025
saad-chaudhry-7vyTHevoeJM-unsplash.jpeg
May 8, 2025
Sponsored Post | Holidays with Peace of Mind
May 8, 2025
May 8, 2025
Guernsey The Grandmother, a neolithic statue at St Martins church, is often bedecked with floral tributes..jpeg
May 6, 2025
Folklore | Guernsey Superstitions
May 6, 2025
May 6, 2025
In Making Tags issue 150, christmas makes, cake, Make a hamper
Comment

Make | Scented Pinecones

Iona Bower November 24, 2024

Photography by Jen Chillingsworth

Pinecones can double as natural air fresheners, to which you can add your choice of seasonal scent. They’re excellent decorations, too.

You will need: Pinecones; foil; large sealable bag; essential oils (clove, cinnamon, nutmeg, orange and pine work well).

1 Soak the pinecones in cold water, drain, and place on a foil-lined baking tray. Pop in an oven preheated to 180C/Fan 160C/Gas 4 and bake for 30–60 mins. Check regularly to make sure they don’t burn. Leave to cool.

2 Place the cooled pinecones in a large sealable bag and add a few drops of essential oils. Seal the bag, then shake and leave for several days. The more drops of oil, the stronger the scent.

3 Remove the cones from the bag and display in a bowl or make a garland by stringing them together on twine.

Maker’s note: Never pick any pinecones from a tree but check under conifers for those that have dropped. When foraging for natural materials, remember that you may require permission from the local authority or landowner. Many essential oils, including cinnamon and pine, are not safe to use around pets.

This is one of the ideas from our feature ‘Scents of the Season’ in the December issue, which is all about natural ways to enjoy the aromas of winter. The feature is taken from Green Christmas by
Jen Chillingsworth (Quadrille).

Buy this month's The Simple Things buy, download or subscribe

More of nature’s gifts…

Featured
Scented pinecones.jpg
Nov 24, 2024
Make | Scented Pinecones
Nov 24, 2024
Nov 24, 2024
Natural Watercolours.jpg
Mar 3, 2024
Make | Natural Watercolours
Mar 3, 2024
Mar 3, 2024
Bathsalts make 2.jpg
Oct 30, 2022
Make | Homemade Bath Salts
Oct 30, 2022
Oct 30, 2022

More from our blog…

Featured
Broad beans.jpeg
May 10, 2025
Recipe | Spring Beans on Toast
May 10, 2025
May 10, 2025
saad-chaudhry-7vyTHevoeJM-unsplash.jpeg
May 8, 2025
Sponsored Post | Holidays with Peace of Mind
May 8, 2025
May 8, 2025
Guernsey The Grandmother, a neolithic statue at St Martins church, is often bedecked with floral tributes..jpeg
May 6, 2025
Folklore | Guernsey Superstitions
May 6, 2025
May 6, 2025
In Making Tags issue 150, nature project, pine cones, natural gifts
Comment

Make | Dip Dye Candles

Iona Bower October 27, 2024

Illustration: Christina Carpenter

This simple project will bring light and colour to dark days now the evenings are longer

You will need: two empty food tins; plain taper candles; old crayons (or new ones, paper coverings removed and broken up) in two colours; old candle stumps or wax pellets from a craft shop.

1. Put the candle stubs or wax pellets and some broken-up crayons in each of the tins; one colour per tin. Blue candles with yellow and hot pink dips look great, but do as you please. The higher the ratio of crayons to wax, the deeper the colour.

2. Stand the tins in a pan of water and bring to the boil, stirring. Once melted together, take the tins out and stand on a heatproof surface.

3. Dip one end of your candle into one of the colours and the other end into the other colour. Shake off any excess and hold until the wax begins to harden. Place the dipped candles on greaseproof paper until completely hard.

The kitchen table project above is taken from our November Almanac pages by Iona Bower, which each month feature seasonal things to note and notice, plan and do.

Buy this month's The Simple Things - buy, download or subscribe
More candles for dark days…

Featured
Dip Dye Candles.jpg
Oct 27, 2024
Make | Dip Dye Candles
Oct 27, 2024
Oct 27, 2024
Kay Prestney candles.jpg
Nov 18, 2023
Project | Paint Your Own Candles
Nov 18, 2023
Nov 18, 2023
Back cover.jpg
Sep 7, 2023
September | Things to Appreciate
Sep 7, 2023
Sep 7, 2023

More from our blog…

Featured
Broad beans.jpeg
May 10, 2025
Recipe | Spring Beans on Toast
May 10, 2025
May 10, 2025
saad-chaudhry-7vyTHevoeJM-unsplash.jpeg
May 8, 2025
Sponsored Post | Holidays with Peace of Mind
May 8, 2025
May 8, 2025
Guernsey The Grandmother, a neolithic statue at St Martins church, is often bedecked with floral tributes..jpeg
May 6, 2025
Folklore | Guernsey Superstitions
May 6, 2025
May 6, 2025
In Making Tags issue 159, candles, craft
Comment

Weekend Project | Templates for your felt mittens and slippers

Iona Bower October 16, 2024

Cosy slippers and colourful mittens, stitched with Scandi style, will keep you warm all winter

You can make the winter warmers pictured above with the instructions and kit lists from our Weekend Project in our October issue. But first you’ll need the templates (with stitching patterns), which you can click to print below and scale up or down as needed.

Click here for the slippers template and stitch guide

Click here for the mittens template and stitch guide

More from our blog…

Featured
Broad beans.jpeg
May 10, 2025
Recipe | Spring Beans on Toast
May 10, 2025
May 10, 2025
saad-chaudhry-7vyTHevoeJM-unsplash.jpeg
May 8, 2025
Sponsored Post | Holidays with Peace of Mind
May 8, 2025
May 8, 2025
Guernsey The Grandmother, a neolithic statue at St Martins church, is often bedecked with floral tributes..jpeg
May 6, 2025
Folklore | Guernsey Superstitions
May 6, 2025
May 6, 2025

More things to make and do…

Featured
Dip Dye Candles.jpg
Oct 27, 2024
Make | Dip Dye Candles
Oct 27, 2024
Oct 27, 2024
LaylasLeash.jpg
Sep 18, 2024
Make | A Macrame Dog Lead
Sep 18, 2024
Sep 18, 2024
EGGShell-tealights-the-simple-things.png
Apr 10, 2023
Eggshell tea lights
Apr 10, 2023
Apr 10, 2023
In Making Tags issue 149, felt, templates
Comment

How To | Launch Your Own Tiny Magazine

Iona Bower September 21, 2024

If you’ve ever flicked through a copy of The Simple Things and thought that we must have a lot of fun making an independent magazine, you’d be absolutely right. Here’s how you can have a slice of the fun yourself by creating a ‘mini’ magazine of your very own.

A ‘zine’ (pronounced ‘zeen’) is a magazine in a very small format that you can unfold to photocopy and then distribute within your community, whether that’s your church, school or a gang of your friends. They began back in the 1930s when people produced their own science fiction fanzines (or ‘zines’, for short) to share with other fans. They’ve had many resurgences over the years, with political zines being published in the 1960s and cultural ones during the punk era of the 80s. Whatever your interest, there will have been a zine for it at some point and if not - you can make your own! Here’s how:


1. Decide on a theme for your zine. It could be for a local community group, it could be self-published poetry, or just something very niche… recipes for brownies? Portraits of your neighbourhood’s cats? An illustration of the life cycle of a hawk moth? It’s all up to you. You’ll want to give it a name, too.

2. Decide whether you need to assemble a team of mates to help or if this is a solo project, and then get people on board or simply stock up on coffee and good biscuits before going it alone. 

3. Make your original zine. There are several formats you can use but the easiest is the eight-page zine. You can search instructions on how to do the folds for an eight-page zine online. There are several on YouTube or try ‘How To Make a Zine’ on Mymodernet.com. Make the folds first and number the pages, then you can flatten it out again to write or draw on each page. You will need to make one snip between pages 3 and 8 or 4 and 7. 

4. Design your cover on page one and your back cover on page eight, then fill the remaining pages with your content. Don’t forget you can stick in photos and blocks of text, use calligraphy or other images. It just needs to be clear enough to read when photocopied.

5. Unfold and flatten out your zine, photocopy as many copies as you need and then fold them all in the same way as you folded and snipped your original. 

6. Sell, give away or foist your indie zine upon friends, family and unsuspecting locals. 


If you’re already feeling inspired, don’t miss our My Living feature in the September issue, which is all about producers of indie mags. And if you’re looking for more indie mags to read yourself, you can always find plenty of them on our sister site Pics & Ink where you can buy mags on every subject imaginable, from adventure and travel to food and drink to film and music. Head to picsandink.com to have a browse.


More from our September issue…

Featured
Make a zine.JPG
Sep 21, 2024
How To | Launch Your Own Tiny Magazine
Sep 21, 2024
Sep 21, 2024
My Neighbourhood Island.jpg
Sep 17, 2024
10 Reasons | To Live on an Island
Sep 17, 2024
Sep 17, 2024
Hedgerow Fizz.jpg
Sep 7, 2024
Tipple | Hedgerow Fizz
Sep 7, 2024
Sep 7, 2024

More things to make with paper…

Featured
Make a zine.JPG
Sep 21, 2024
How To | Launch Your Own Tiny Magazine
Sep 21, 2024
Sep 21, 2024
Origami folds.jpg
Mar 23, 2024
Learn | Basic Origami Folds
Mar 23, 2024
Mar 23, 2024
135_PaperStars.jpg
Dec 12, 2023
Make | Painted Paper Stars
Dec 12, 2023
Dec 12, 2023


In Making Tags issue 147, paper, zines, papercraft, magazine
Comment

Make | A Macrame Dog Lead

Iona Bower September 18, 2024

Give your pup some extra flair while keeping them safe and secure on walks. If you’re looking for a project where you can comfortably sit while working, this is a great one to tackle.  


You will need: 

14.6m of 5mm braided cotton cord in off-white/natural color 

13.4m of 5mm braided cotton cord in color of your choice  

Swivel snap hook (approximately 70mm long) – we got ours from trimmingshop.co.uk 

Clipboard 

Measuring tape 

Scissors 


Cut List: 

1 x 13.4m long, of 5mm braided cotton cord in Mustard Yellow (or color of your choice) 

1 x 13.4m long, of 5mm braided cotton cord in off-white/natural color 

1 x 122cm long, of 5mm braided cotton cord in off-white/natural color 


1 Attach the snap hook to a clip board. Take the 13.4m piece of colored cord and use the Bundling Cord technique to bundle up one end until there is about 3m of cord remaining. Measure 2.4m from the remaining end, and fold the cord in half at that point. Create a Reverse Lark’s Head Knot around your snap hook, ensuring that the bundled end is on the outside of your snap hook and the 2.4m end is on the inside. 

2 Repeat step 1 with the 13.4m length of off-white cord. Make sure that when attaching to the snap hook, the shorter ends of both pieces of cord are in the center. These two cords will be our filler cords for the entire project. 

3 Take the left cord and create a loose “4” shape over the second cord. Wrap it behind that cord, and pull the bundle through the loop created. Tighten this knot so it sits right below the Reverse Lark’s Head Knots created in steps 1 and 2. 

4 Repeat by creating a loose “4” shape again with that same cord, but this time cross it over both center cords, wrap it behind these two center cords and pull the bundle through the loop created. Tighten to the knot above. 

5 Repeat steps 3 and 4, but this time create a loose backward “4” shape with your farthest right cord. Take the right cord and cross it over the cord closest to it. Wrap it behind that cord, pull the bundle through the loop created and tighten. Do the same with both center cords just as you did on the left. 

6 Continue this pattern by alternating the left cord and the right cord as your working cords all the way down for 1.5m. Adjust the lead on your clipboard as necessary. Pull cord from each bundle as needed so you have a comfortable amount of cord to work with. 

7 Once this first section of knots measures at 1.5m in length, it is time to create the handle of your leash. Measure 5cm down from your last knot and create a Square Knot using the same working cords. From there, continue making Square Knots until this section of Square Knots measures 38cm in length. 

8 Remove the leash from the clipboard and fold this section of Square Knots in half. You will see the handle start to form. 

9 Take the two filler cords and feed them through the center of the 5cm opening you created. 

10 Using your working cords, create Square Knots around all six cords until you hit the section of knots below. 

11 Take the 122cm three-strand off-white piece of cord and tie a Gathering Knot around this most recent section of Square Knots. 

12 Make sure this knot is nice and tight! Once you feel it is secure, cut off all the ends as close to the Gathering Knot as possible. You can also use the tip of your scissors to help push any excess ends into your Gathering Knot for a cleaner look. 

 You can find more instructions on how to create all these knots in our October issue, where you can also find instructions on how to make a macrame plant pot holder.

Taken from The Complete Beginner’s Guide To Macramé by Alisha Ing (Page Street Publishing)

More from our blog…

Featured
Broad beans.jpeg
May 10, 2025
Recipe | Spring Beans on Toast
May 10, 2025
May 10, 2025
saad-chaudhry-7vyTHevoeJM-unsplash.jpeg
May 8, 2025
Sponsored Post | Holidays with Peace of Mind
May 8, 2025
May 8, 2025
Guernsey The Grandmother, a neolithic statue at St Martins church, is often bedecked with floral tributes..jpeg
May 6, 2025
Folklore | Guernsey Superstitions
May 6, 2025
May 6, 2025

More things to make…

Featured
Dip Dye Candles.jpg
Oct 27, 2024
Make | Dip Dye Candles
Oct 27, 2024
Oct 27, 2024
LaylasLeash.jpg
Sep 18, 2024
Make | A Macrame Dog Lead
Sep 18, 2024
Sep 18, 2024
EGGShell-tealights-the-simple-things.png
Apr 10, 2023
Eggshell tea lights
Apr 10, 2023
Apr 10, 2023
In Making Tags macrame, craft
Comment

Illustration by Christina Carpenter

Make | A Chalk Board Serving Tray

Iona Bower June 23, 2024

Serve nibbles in style in the garden with this simple project

You’ll need:
A thin plank of stained and treated wood from a hardware store (around 200mm wide) cut to your desired length
Chalkbboard paint
Brush
Masking tape
T-bar cupboard handles (180mm) with fixings
Chalk pen

To make:
1. Give the plank a quick rub down and then, using masking tape, tape off a ‘frame’ around the edge of the plank.

2. Paint the middle area with two or three layers of the chalkboard paint and leave to dry thoroughly after each layer.

3. Peel off the masking tape and attach the handles to either end using a screwdriver.

4. Write the names of your cheeses, charcuterie or other snacks on the chalkboard area, next to the respective food items, as takes your fancy. Or simply have a doodle as you nibble.

This is just one of the ideas to mark the month from our ‘Almanac’ pages. Read more things to note and notice, plan and do in our July issue.

Buy this month's The Simple Things - buy, download or subscribe

More things to make this summer…

Featured
Helen Sellwood Gallery My Place.jpg
Mar 11, 2023
Make | Your Own Gallery
Mar 11, 2023
Mar 11, 2023
SIM73.MAKES_HG_Sunshine Spaces_28391.png
Aug 26, 2022
Make | Outdoor canvas hammock
Aug 26, 2022
Aug 26, 2022
SIM67.MAKES_Step3_5.png
Sep 18, 2021
Make | Dip dye stationery
Sep 18, 2021
Sep 18, 2021

More from our blog…

Featured
Broad beans.jpeg
May 10, 2025
Recipe | Spring Beans on Toast
May 10, 2025
May 10, 2025
saad-chaudhry-7vyTHevoeJM-unsplash.jpeg
May 8, 2025
Sponsored Post | Holidays with Peace of Mind
May 8, 2025
May 8, 2025
Guernsey The Grandmother, a neolithic statue at St Martins church, is often bedecked with floral tributes..jpeg
May 6, 2025
Folklore | Guernsey Superstitions
May 6, 2025
May 6, 2025
In Making Tags issue 145, project, make project
Comment

Craft | Heart on Your Sleeve Template

Iona Bower April 24, 2024

Stitch this simple badge to help you wear your heart on your sleeve.

If you want to get started on the heart-on-you-sleeve-badge project from our May issue, you’ll need some templates before you start stitching. You can click to download and print them here. Then just pick up a copy of the May ‘Folk’ issue to find the rest of the instructions. The magazine is sold in all good shops and supermarkets and you can also order it from our online store at thesimplethings.com.

In Making Tags templates
Comment

Illustration by Maru Godas

Make | Kitchen Face Masks

Iona Bower February 11, 2024

Natural balms and lotions are good for your skin but making them is good for your soul, too. If you’re new to homemade skincare, here are a few masks you can make with just a few kitchen ingredients - and they all take 15 minute or less to whip up.

Avocado, Banana & Honey Revitalising Mask

1 Using a fork, mash a banana and avocado together. Stir in 1 tbsp of honey.

2 Apply to your face and leave for 15 minutes. Remove with lukewarm water.

2-in-1 Nourishing Treatment with Egg

1 Separate an egg and, in a bowl, mix the yolk with 2 tbsp olive oil and 1 tbsp brewer’s yeast. Mix well.

2 Apply to the hair, focusing on mid length to ends, wrap in a towel and leave to work.

3 Meanwhile, beat the egg white and apply it to the eyelid and eye contour area using a cotton wool pad. To the rest of the egg white add 1 tbsp honey and a splash of almond or olive oil and spread over the face and neck.

4 Rest for 10 minutes then rinse in the shower.

Potato Power

1 Wash and peel a potato. Place some of the skins in the freezer.

2 Grate the potato and add 1 tbsp powdered milk or 2 tbsp yogurt. Spread the mixture over your face.

3 Take the skins out of the freezer and place them around your eyes (on the lids and underneath the eye), then relax for 15 minutes. Remove the mask with warm water

If you feel ready for some slightly more complex homemade beauty makes, don’t miss our feature, ‘Homemade and Healing’ in our February issue, which is in shops now. As well as these kitchen face masks there are also instructions to make Ylang Ylang Flower Hair Creme, Honey and Olive Oil Beauty Balm, Kaolin and Mint Toothpaste and a Natural Deodrant Stick. The ideas are all taken from Organic Beauty: An Illustrated Guide To Making Your Own Skincare by Maru Godas (Smith Street Books).

Buy this month's The Simple Things - buy, download or subscribe

More projects to make you feel good…

Featured
Wellbeing.jpg
Feb 11, 2024
Make | Kitchen Face Masks
Feb 11, 2024
Feb 11, 2024
Bay Lemon Salt Scrub Kirstie Young.jpg
Nov 13, 2021
Make | Bay and Lemon Sea Salt Body Scrub
Nov 13, 2021
Nov 13, 2021
Lip Balm Kirstie Young.jpg
Apr 4, 2021
Make | Chocolate & Peppermint Lip Balm
Apr 4, 2021
Apr 4, 2021

More from our blog…

Featured
Broad beans.jpeg
May 10, 2025
Recipe | Spring Beans on Toast
May 10, 2025
May 10, 2025
saad-chaudhry-7vyTHevoeJM-unsplash.jpeg
May 8, 2025
Sponsored Post | Holidays with Peace of Mind
May 8, 2025
May 8, 2025
Guernsey The Grandmother, a neolithic statue at St Martins church, is often bedecked with floral tributes..jpeg
May 6, 2025
Folklore | Guernsey Superstitions
May 6, 2025
May 6, 2025
In Making Tags make, homemade beauty, natural skincare
Comment

Learn | An Endangered Craft

Iona Bower November 14, 2023

Photography by Jeff Gilbert

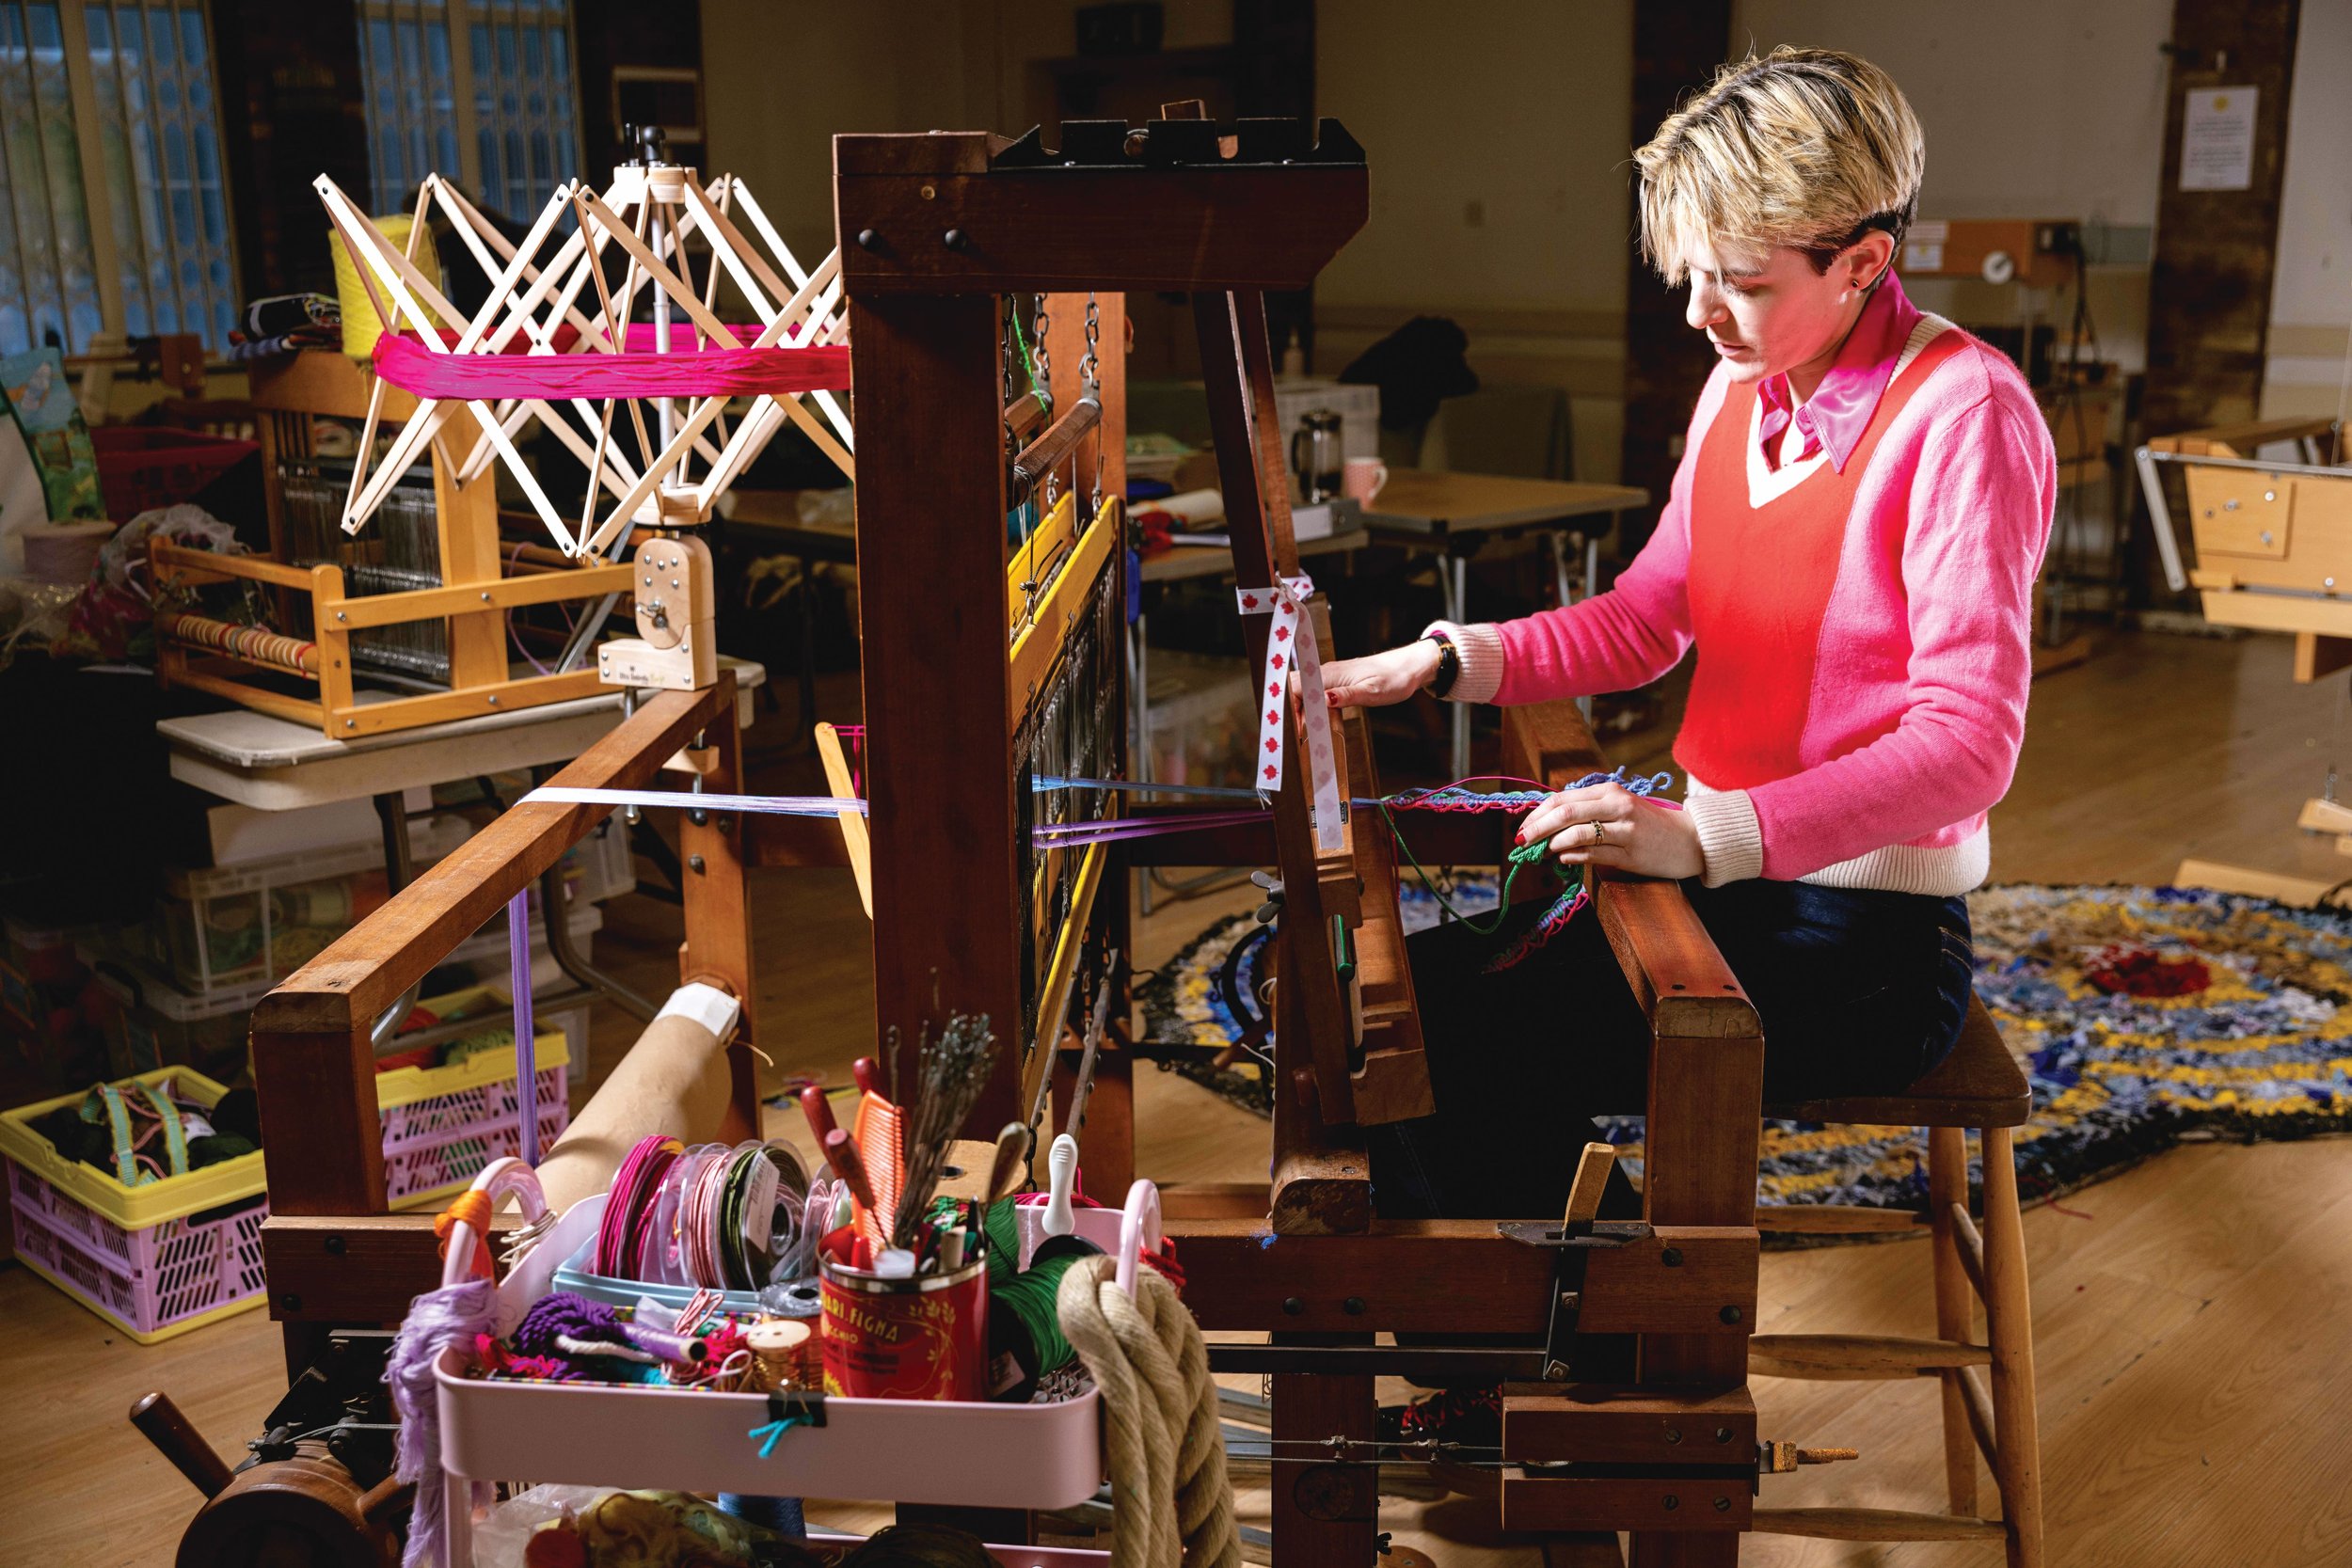
Taking up a new craft is a delicious challenge and something that helps us feel we’re growing and developing. So imagine the glow of taking up a craft that is in danger of dying out. 

In our November issue, we met Elizabeth Ashdown (pictured above), who practises passementerie, the craft of making ornamental embellishments. She’s the youngest of only six people practising this craft in the UK, which inspired us to find out which other crafts were in danger of becoming extinct. 

Below are a list of crafts that Heritage Crafts have on their ‘critically endangered’ crafts list. Click on each one for information from Heritage Crafts on training opportunities, number of practitioners and more. You might be inspired to take a course or simply give it a go yourself. 

Critically endangered crafts

The crafts listed below are considered to be at serious risk of dying out in the UK (Heritage Crafts also a category of crafts that are only regarded as ‘endangered’. Crafts that are critically endangered might be due to a lack of craftspeople, reduced opportunities for training, being financially unviable or simply that there is no longer a way to pass on the skills and knowledge required. 

  • Arrowsmithing 

  • Basketwork furniture making

  • Bell founding

  • Bow making (musical) 

  • Bowed-felt hat making

  • Chain making 

  • Clay pipe making

  • Clog making

  • Coiled straw basket making

  • Coppersmithing (objects) 

  • Compass and navigational instrument making

  • Copper wheel engraving

  • Currach making

  • Devon stave basket making

  • Diamond cutting

  • Encaustic tile making 

  • Engine turned engraving

  • Fabric pleating

  • Fair Isle chair making

  • Fan making

  • Flute making (concert)

  • Fore-edge painting

  • Frame knitting

  • Glass eye making

  • Hat block making 

  • Hat plaiting

  • Hazel basket making

  • Highland thatching

  • Horse collar making

  • Horsehair weaving

  • Industrial pottery

  • Linen damask weaving

  • Maille making

  • Metal thread making

  • Millwrighting

  • Northern Isles basket making

  • Oak bark tanning

  • Orrery making

  • Paper making (commercial handmade)

  • Parchment and vellum making

  • Piano making

  • Plane making

  • Plume making 

  • Pointe shoe making

  • Saw making

  • Scientific and optical instrument making

  • Scissor making

  • Sieve and riddle making

  • Silk ribbon making 

  • Silver spinning

  • Spade making (forged heads)

  • Spinning wheel making

  • Sporran making

  • Straw hat making 

  • Sussex trug making 

  • Swill basket making

  • Tinsmithing

  • Wainwrighting

  • Watch face enamelling

  • Watch making

  • Whip making 

  • Withy pot making

  • Wooden fishing net making


You can read about Elizabeth and her passementierie in our November issue, as well as others who are doing their best to save beautiful and rare things from extinction, from languages to red squirrels. Turn to page 66 to read The Preservation Society. 

Buy this month's The Simple Things - buy, download or subscribe


More from our November issue…

Featured
NinaThompson_Track Clinic Wellbeing Pets.jpg
Nov 21, 2023
Pets | Could Your Pet Be a Therapist?
Nov 21, 2023
Nov 21, 2023
Kay Prestney candles.jpg
Nov 18, 2023
Project | Paint Your Own Candles
Nov 18, 2023
Nov 18, 2023
Passementerie Jeff Gilbert.jpg
Nov 14, 2023
Learn | An Endangered Craft
Nov 14, 2023
Nov 14, 2023

More crafts to try today…

Featured
Passementerie Jeff Gilbert.jpg
Nov 14, 2023
Learn | An Endangered Craft
Nov 14, 2023
Nov 14, 2023
Woolly Mahoosive.jpg
Dec 15, 2022
Learn something new | Arm Knitting
Dec 15, 2022
Dec 15, 2022
Candle holder Joe McIntyre.JPG
Jan 9, 2021
Make | Candle Holder
Jan 9, 2021
Jan 9, 2021
In Making Tags issue 137, crafts
Comment
Photography: Jonathan Cherry

Photography: Jonathan Cherry

Make | a pumpkin beer keg

Iona Bower October 31, 2023

Because there’s lots more fun to be had with a pumpkin than just carving it

Fancy making this pumpking beer keg as a centrepiece for your own pumpkin party or Halloween celebrations? Of course you do! You’re only human! Inserting a spigot into a hollowed-out pumpkin will transform it into a keg that’ll give your favourite tipple a subtle flavour and keep it cool till pumpkin time.

You will need

Pumpkin Knife
Spoon
Ruler
Spigot (tap)
Sharpie
Drill
Seasonal beer

1 Cut off the crown of the pumpkin and set aside. Scoop out all of the pumpkin seeds (save the seeds to toast later if you wish). 
2 After measuring the diameter of your spigot, select a drill bit 2mm smaller so your spigot will fit snugly and be ‘beer tight’. 
3 Mark and drill a hole towards the base of the pumpkin. Insert the spigot into the hole. 
4 Fill with seasonal beer and replace the crown. 
5 Allow to infuse for a couple of hours and enjoy. 

This make was first featured in our Pumpkin Party ‘Gathering’ in our October 2019 issue, with recipes by Bex Long, including beetroot raita, parsnip soup, acorn squash with chermoula dressing, sausage rolls, kale, walnut and pomegranate salad and more. It’s so autumnal it’s enough to burnish your conkers. You can buy a copy of the back issue from our online store.

Get hold of your copy of this month's The Simple Things - buy, download or subscribe
More from our October 2023 issue…

Featured
AdobeStock_276831672_Preview.jpg
Oct 23, 2023
Project | Make Seed Bombs
Oct 23, 2023
Oct 23, 2023
Jessica Benhar-Little red riding hood-1200 dpi.jpg
Oct 21, 2023
Create | Fairytale Story Starters
Oct 21, 2023
Oct 21, 2023
Longboarding.jpg
Oct 17, 2023
Learn to | Dance on a Longboard
Oct 17, 2023
Oct 17, 2023

More pumpkinspiration…

Featured
Pumpkin Beer Keg Jonathan Cherry.jpg
Oct 31, 2023
Make | a pumpkin beer keg
Oct 31, 2023
Oct 31, 2023
David Grant Suttie.jpg
Oct 24, 2021
Pumpkin varieties | What are they gourd for?
Oct 24, 2021
Oct 24, 2021
Pumpkin creme brulee.JPG
Oct 16, 2021
Recipe | Mini Pumpkin Creme Brulees
Oct 16, 2021
Oct 16, 2021


In Making Tags halloween, autumn, pumpkin, pumpkins, October, issue 88, pumpkin craft
Comment

Photography by Adobe Stock

Project | Make Seed Bombs

Iona Bower October 23, 2023

For an explosion of flowers in a neglected patch of land, seed bombs are a fun way of
guerrilla gardening.

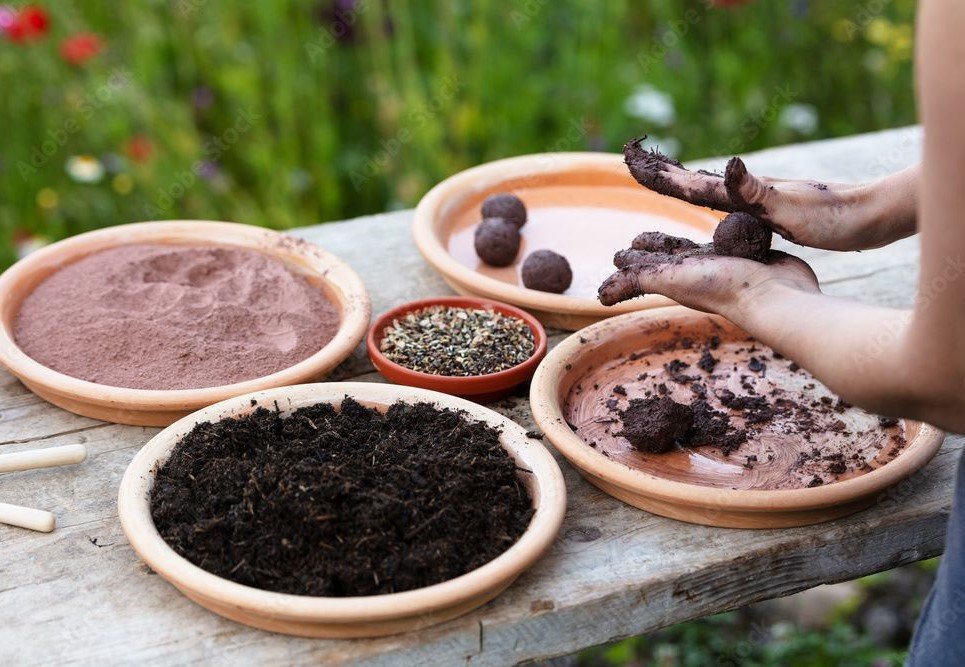
You will need:

Seeds (1 part)
Peat-free compost (5 parts)
Powdered red clay (available online and at most craft shops) 2–3 parts
Mixing bowl Plates

1 How many bombs you make will depend on how many seeds you have. It’s easiest to do this recipe using cups (actual cups, rather than US measurements) – for one cup of seeds, you’ll need 5 cups of compost and 2–3 cups of powdered clay.

2 Pour all the ingredients into a bowl and mix, then gradually add cold water until it begins to bind together – you don’t want it too wet.

3 Roll the mixture into meatball-sized balls (making sure each ball has plenty of seeds in it). Place the balls on a plate to dry out in the sun.

4 Once dried, throw them on to soil and cross your fingers for flowers. They make great gifts, especially if you put a few in a hessian bag.

Maker’s note: You can make these using air-drying clay, too. Simply take a large lump of clay and flatten it into a circle, sprinkle over compost and seeds then squish it all together so the seeds are evenly distributed. Pull off lumps of the mix and roll into balls, or roll it out and cut shapes using cookie cutters before allowing to air dry.

This project was taken from our feature Gather, Grow and Gift in our October issue, a collection of ideas for makes involving seeds, including seed papers and seed packets as well as these seed bombs.

Buy this month's The Simple Things - buy, download or subscribe

More seed inspiration…

Featured
Screenshot 2023-09-14 at 11.34.22.png
Sep 14, 2023
Playlist | Colours
Sep 14, 2023
Sep 14, 2023
Seed packets Emma harris.jpg
Nov 1, 2020
Make | Personalised Seed Packets
Nov 1, 2020
Nov 1, 2020
Cabbage never tasted this good
Jan 9, 2014
Cabbage never tasted this good
Jan 9, 2014
Jan 9, 2014

More from our October issue…

Featured
AdobeStock_276831672_Preview.jpg
Oct 23, 2023
Project | Make Seed Bombs
Oct 23, 2023
Oct 23, 2023
Jessica Benhar-Little red riding hood-1200 dpi.jpg
Oct 21, 2023
Create | Fairytale Story Starters
Oct 21, 2023
Oct 21, 2023
Longboarding.jpg
Oct 17, 2023
Learn to | Dance on a Longboard
Oct 17, 2023
Oct 17, 2023
In Making Tags issue 136, make, project, outdoor project, seeds
Comment

Photography by Becki Clark

Make | Folk art enamelware

Iona Bower August 5, 2023

This enamel tumbler make is a simple and mindful way to spend an afternoon. You could even make a whole set for summer garden gatherings.

You will need:
Enamelware tumbler
Posca paint pens 3m tip, or enamel paint and brush
Clear spray varnish

1 Make sure your enamel surface is clean and dust free before starting. Your first motif is made up of four branch lines working upwards to the top of the tumbler.

2 Repeat this motif around the tumbler, leaving equal space between each of your motifs.

3 Add small bud shapes at the ends of the branches using other colours. We used ochre and pink, to complement the blue and give a nod to traditional folk art colour palettes.

4 Add your bottom border by drawing lines (around 5cm long) at the base. Along each of these lines add small teardrop-shaped ‘leaves’ that join at the same point along the line and mirror each other.

5 You can then use one of your alternative colours to add a small heart shape at the end of the blue line, creating a folk art floral.

6 Create your top border by drawing on curved lines that have curved teardrops working out from the main stem (a similar shape to paisley) and then use your alternative colour to add a collection of dots working outwards from these teardrops.

7 Add a final border of dots underneath your central branches, working around the whole tumbler. Leave to dry.

The instructions for this make were taken from our August issue feature, Paint Your Flagon, in which Becki Clark shows us how to paint the tumbler above, as well as a bowl and plate, all in a pretty folk design. You’ll find the project from page 106 of the issue, which is in shops now.

Buy this month's The Simple Things - buy, download or subscribe


More weekend projects to make…

Featured
LemongrassChickenRedCurryCoconutSauce.jpg
Aug 23, 2023
Recipe | Tandoor Lemon Chicken with Mango & Coriander Salad
Aug 23, 2023
Aug 23, 2023
Folk enamel tumbler.jpg
Aug 5, 2023
Make | Folk art enamelware
Aug 5, 2023
Aug 5, 2023
Lavender eye pillow.jpg
Jul 22, 2023
Make | A Soothing Lavender Eye Pillow
Jul 22, 2023
Jul 22, 2023

More from our August issue…

Featured
Back Cover.jpg
Aug 28, 2023
August | Things to appreciate
Aug 28, 2023
Aug 28, 2023
We Are History.jpg
Aug 26, 2023
Think | We are history
Aug 26, 2023
Aug 26, 2023
Laughter Anneliese 2.jpg
Aug 22, 2023
Wellbeing | Exercise your laughter muscle
Aug 22, 2023
Aug 22, 2023
In Making Tags issue 134, weekend project, paint, enamel, folk
Comment

Photography and make by Louise Gorrod

Make | A Soothing Lavender Eye Pillow

Iona Bower July 22, 2023

Lavender can ease headaches and help with insomnia, so lie down, pop on your eye pillow… and relax.

You will need

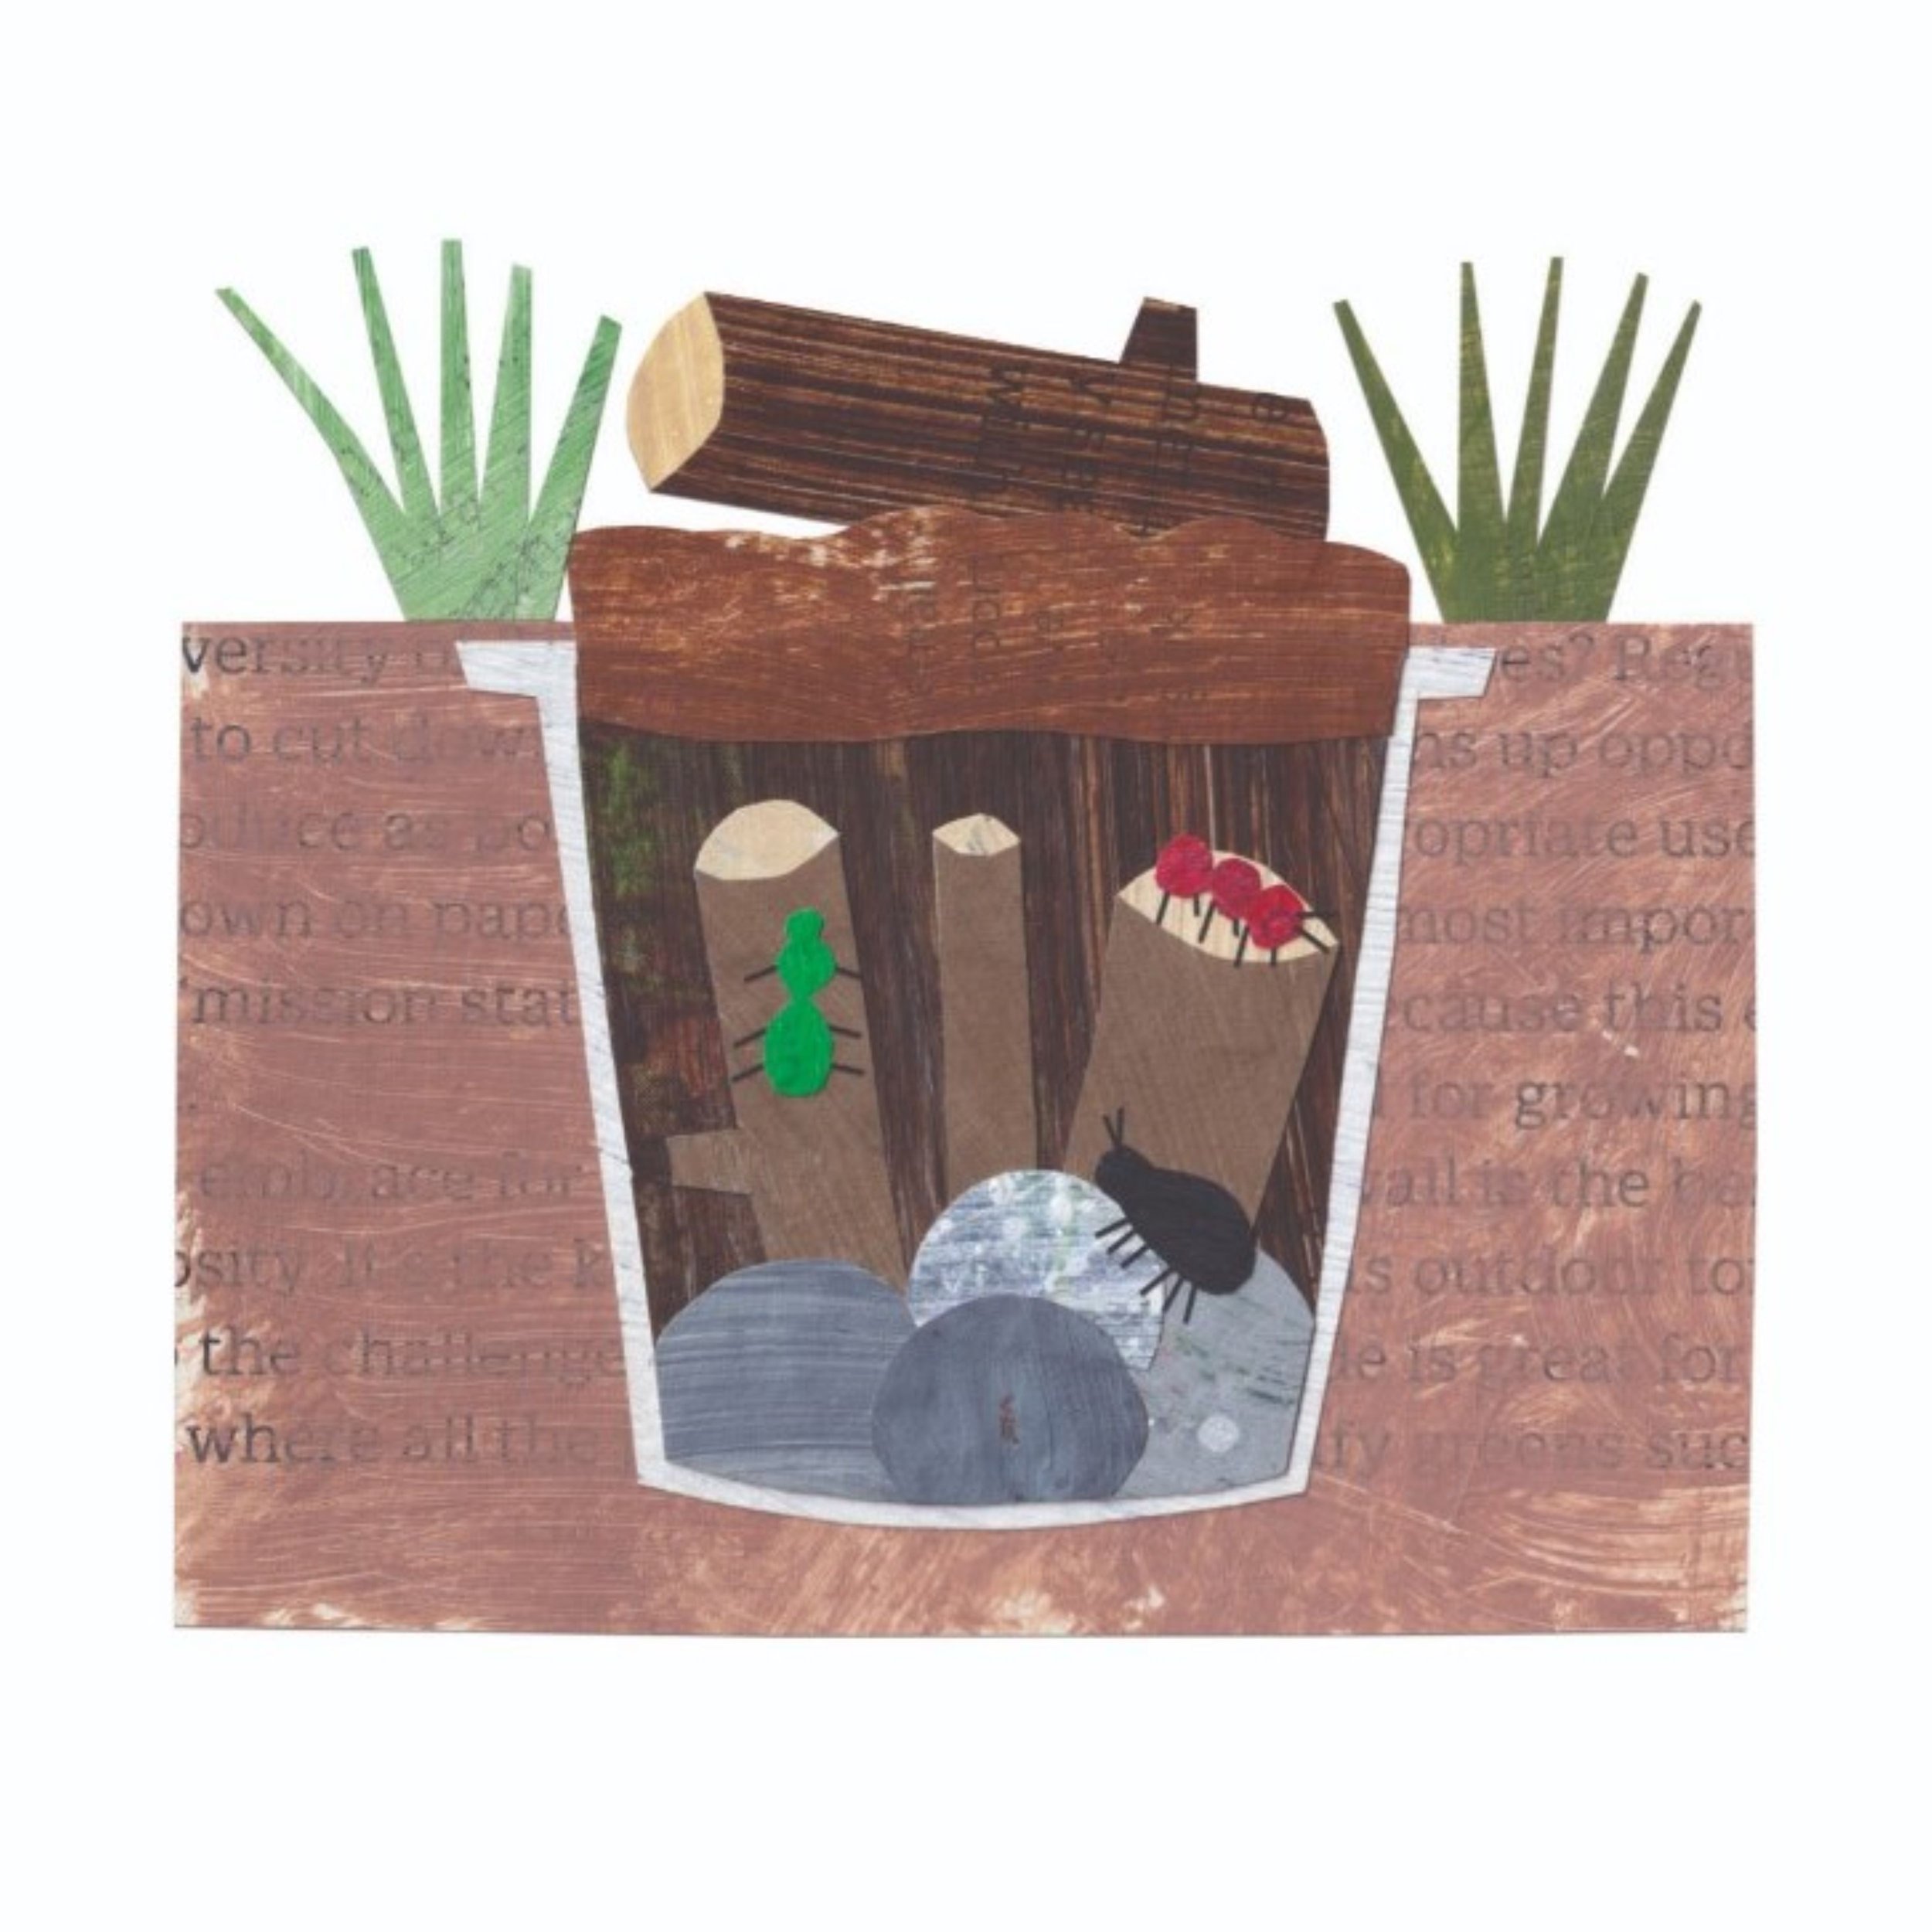
1/2m linen (you will have extra)
170g flax seed
30g lavender buds
Lavender essential oil (optional)

How to make

1 Make sure your linen is washed and dried before you begin. For each pillow, cut 2 layers of fabric measuring 12cm x 27cm.

2 With right sides together, sew 3 of the 4 sides, with a 5mm seam allowance. Turn the pillow the right way out and press.

3 In a bowl, mix the lavender buds, flax seed and a few drops of lavender oil. Add to the bag until mostly full, before folding in the seam allowance of the open edge and sewing it closed

For more ideas for projects to make with lavender, including wands and bath soak, turn to page 52 of the July issue of The Simple Things, in which Louise Gorrod talks us through the projects and teaches us a little bit about lavender on the way.

Buy this month's The Simple Things - buy, download or subscribe
More things to love about lavender…

Featured
raspberrylavendercocktails.jpg
Jun 15, 2024
Tipple | Lavender & Raspberry Cocktails
Jun 15, 2024
Jun 15, 2024
Lavender eye pillow.jpg
Jul 22, 2023
Make | A Soothing Lavender Eye Pillow
Jul 22, 2023
Jul 22, 2023
Greengages on toast2.JPG
Jul 11, 2020
Recipe | Greengages on toast with lavender and fennel flowers
Jul 11, 2020
Jul 11, 2020

More from our July issue…

Featured
gentleprotestfull Gracie Dahl.jpg
Jul 24, 2023
Learn | The Art of Gentle Activism
Jul 24, 2023
Jul 24, 2023
Lavender eye pillow.jpg
Jul 22, 2023
Make | A Soothing Lavender Eye Pillow
Jul 22, 2023
Jul 22, 2023
Topiary for cloud pruninng.jpg
Jul 20, 2023
Try Out | Cloud Pruning
Jul 20, 2023
Jul 20, 2023
In Making Tags issue 133, lavender, makes, weekend project, sewing
Comment

Photography: Jesse Wild and Lindsey Newns

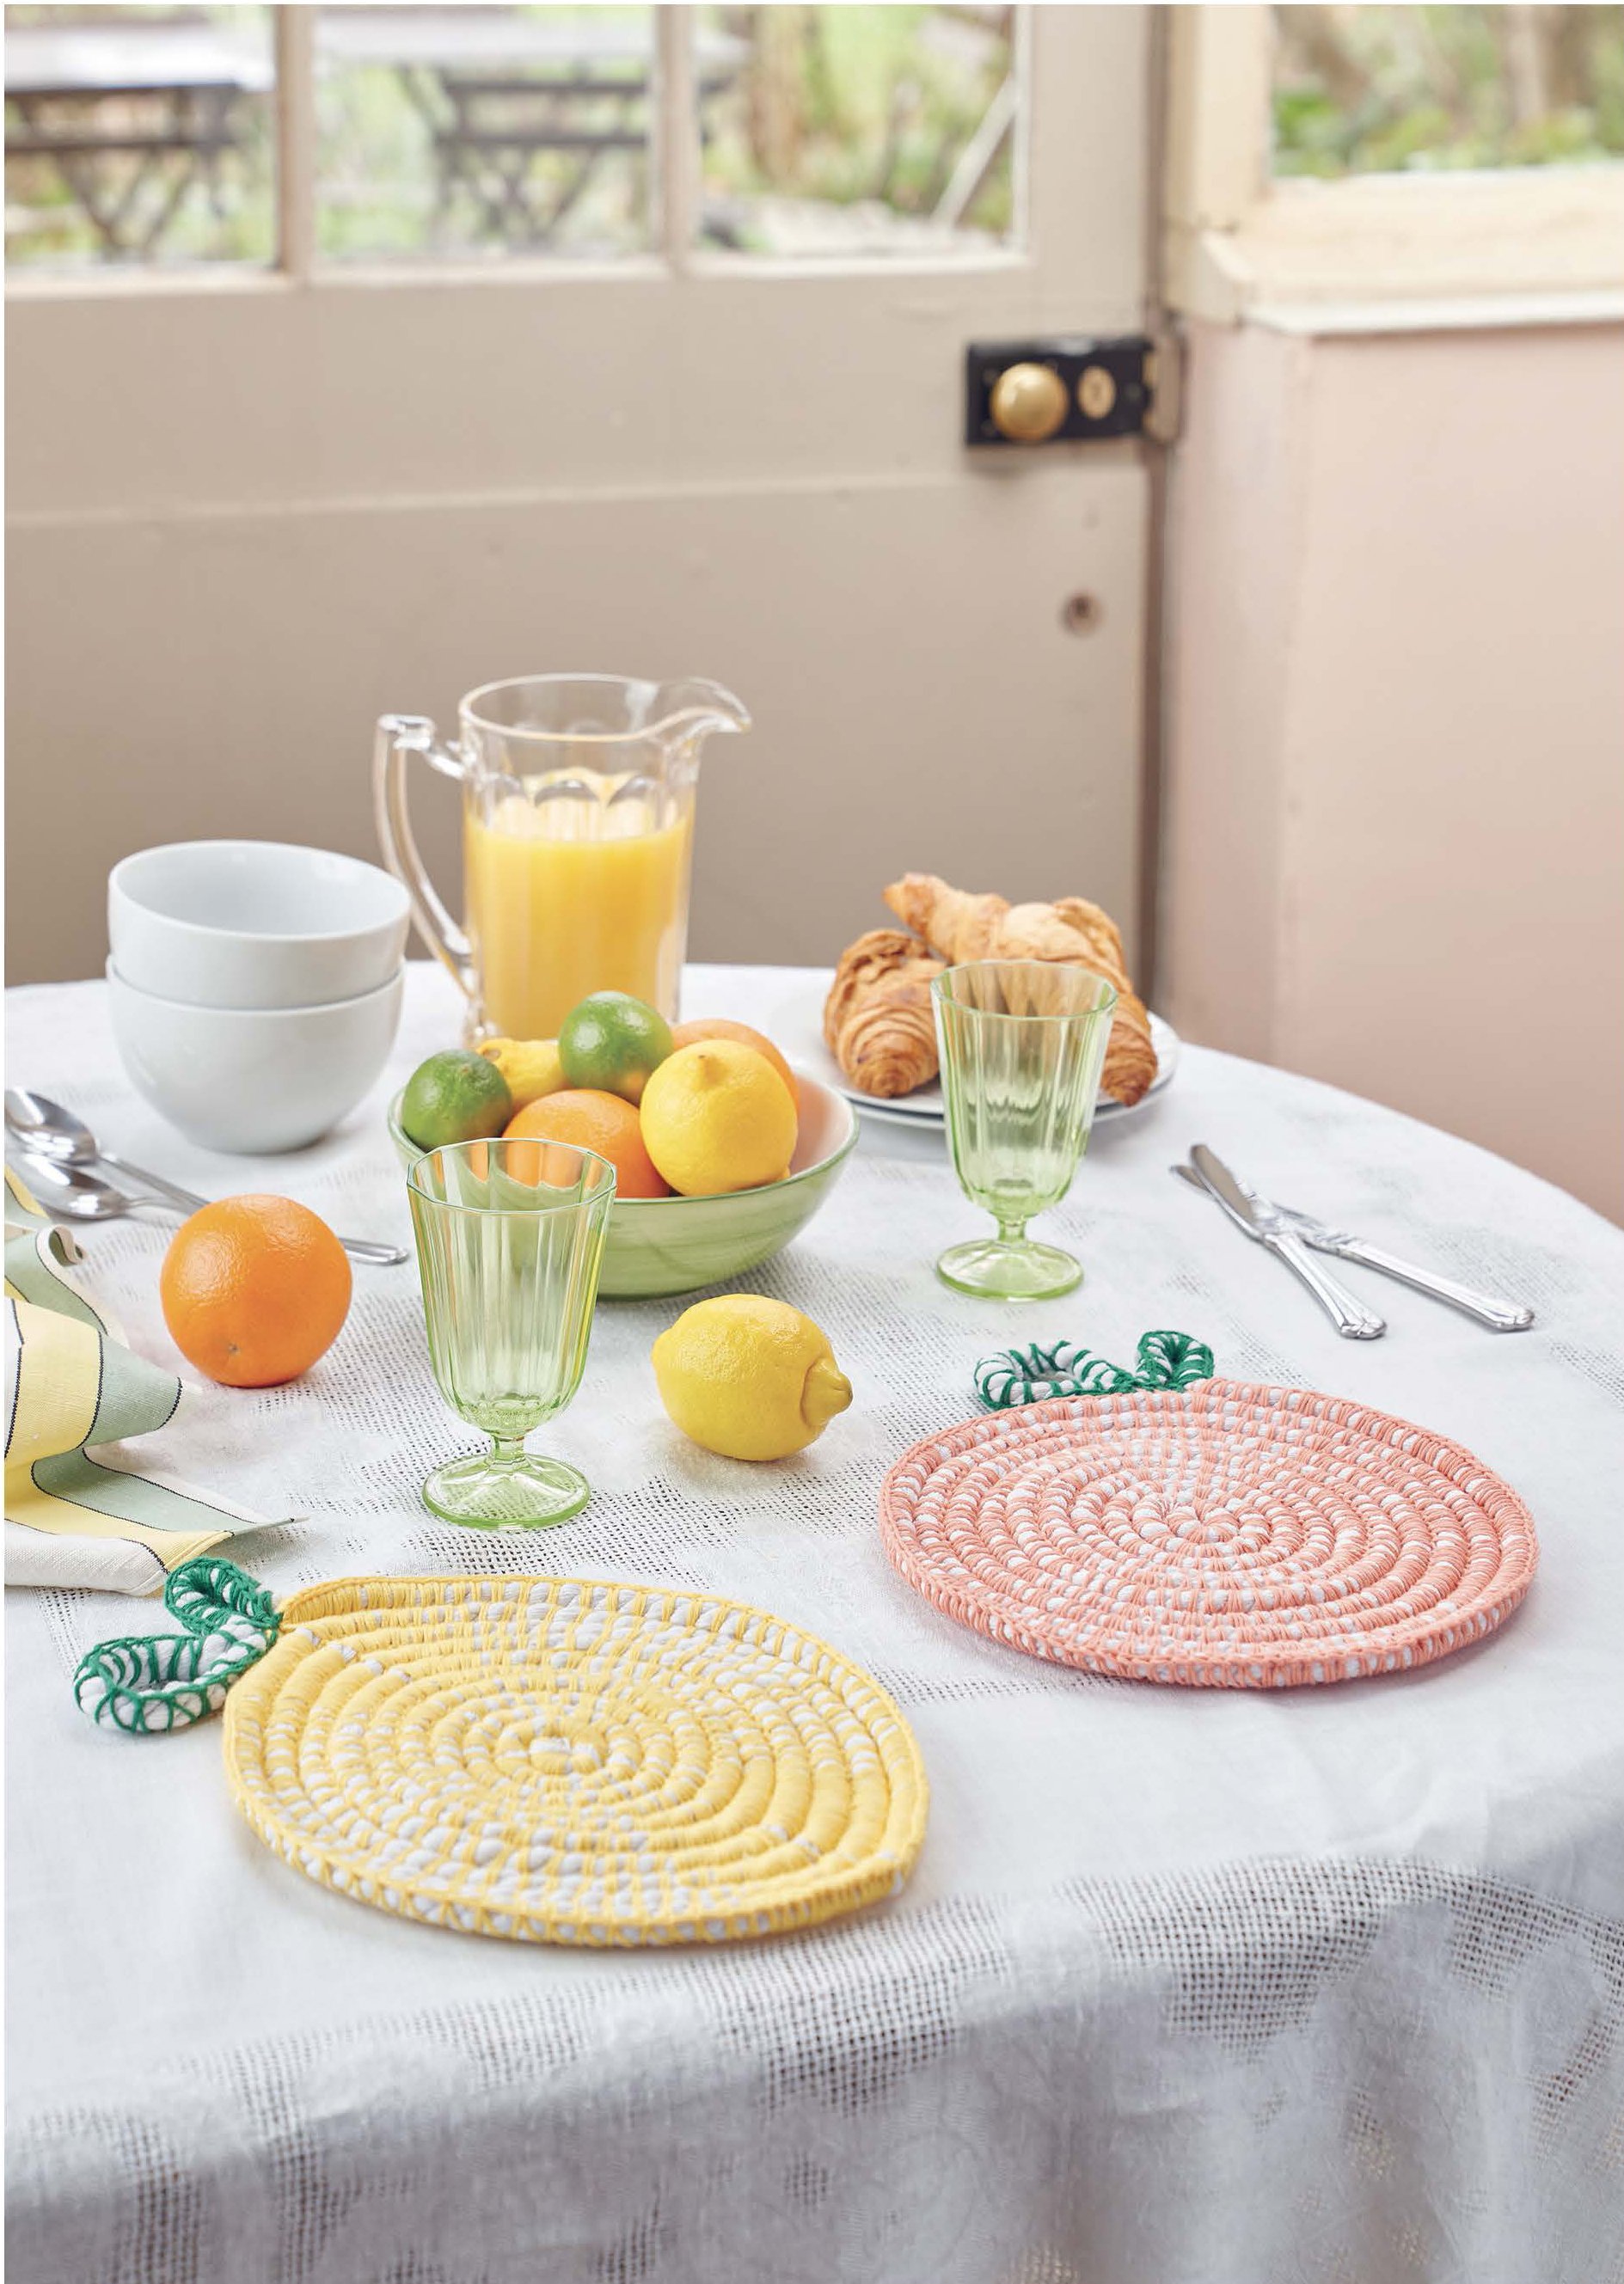
Weekend Project | Crocheted fruit placemats

Iona Bower April 19, 2023

Bring extra flavour to a table – whether inside or out – with these crocheted lemon and peach placemats.

You will need:

Rico Design Ricorumi DK yarn (25g 100% cotton):

x2 balls Yarn A Smokey Orange (024)

x2 balls Yarn B Yellow (006) - if making lemons as well as peaches

x1 ball Yarn C Fir Green (050)

1 x 23m roll of 10mm white chunky macramé cord (We got ours from woollymahoosive.com) 

4mm crochet hook

Stitch marker


Finished size 

Approx. 25cm x 25cm 


Techniques

Magic loop (ML) 

To start a magic loop, create a loop in the same way as you would when making a slip knot. Insert the hook into the loop, from front to back. Wrap the yarn around the hook anticlockwise and pull the yarn through the loop. Ch1 to secure the magic loop. Work the stitches as indicated into the centre of the magic loop, making sure all stitches are worked over the loop itself and the tail end. Once you have worked your first round, pull the tail of the yarn to the close the loop.  

Chain (ch)   

Hold the crochet hook in your hand and make a slip knot on the hook. Bring yarn over hook from back to front and pull the hook towards you to catch the loop. Pull the hooked yarn through the slip knot and onto the hook. One chain made. Repeat these steps, keeping your stitches even, until you have the desired number of stitches. One loop will always remain on the hook.   

Double crochet increase (dcinc)  
Make two double crochet stitches into one from the previous row/round. Insert hook into required stitch, yarn over hook (when you place your hook under the yarn and pull the yarn over the hook from back to front) and pull up a loop (two loops on hook), yarn over hook and then pull through both loops. Repeat once more in the base of the same stitch. 

Double crochet 2 stitches increase (dc3inc) 
Make three double crochet stitches into one from the previous row/round: Insert hook into required stitch, yarn over hook and pull up a loop (two loops on hook), yarn over hook and pull through both loops. Repeat twice more in the base of the same stitch.   

Working in the round: spiral method   

When working in the round, the pattern starts with a Magic Loop or a chained foundation ring. For the first round of the pattern, stitches will be made into the centre of the loop or ring. When working the spiral method, at the end of the round no join will be made to connect the last stitch of the round to the first stitch of the round, and the work is not turned.  

Pattern

For the peach placemat

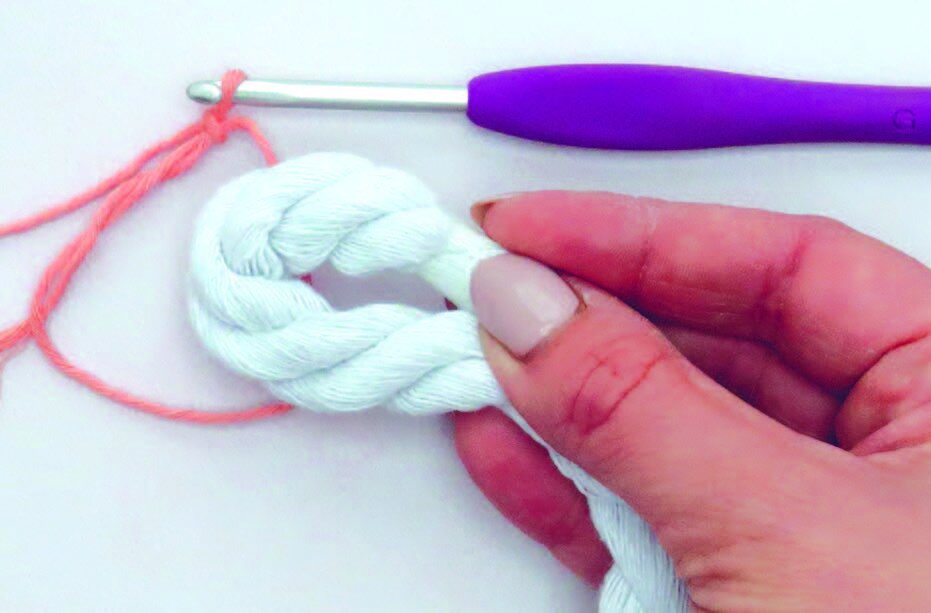
Using Yarn A, carrying cord. Create a Magic Loop and ch1. See below.

Take the end of your cord and fold the end over by 2–3cm to form a loop, with the end of the cord sitting on top. Insert the cord loop into your ML and pull to close. See below.

Rnd 1 Working into the centre of the cord loop, 12dc evenly around the loop. (12sts). See below.

Rnd 2 working into the prev rnd, carrying the cord as you go, *inc; rep from * 11 more times. (24sts) 

Rnd 3 *1dc, dcinc; rep from * 11 more times. (36sts) 

Rnd 4 *2dc, dcinc; rep from * 11 more times. (48sts) 

Rnd 5 *3dc, dcinc; rep from * 11 more times. (60sts). See below.

Rnd 6 *4dc, dcinc; rep from * 11 more times. (72sts) 

Rnd 7 *5dc, dcinc; rep from * 11 more times. (84sts) 

Rnd 8 *6dc, dcinc; rep from * 11 more times. (96sts) 

Rnd 9 *7dc, dcinc; rep from * 11 more times. (108sts) 

Rnd 10 *8dc, dcinc; rep from * 11 more times. (120sts) 

On the last stitch of rnd 10, change colour to Yarn C. 

Cut and fasten off Yarn A by weaving in end. 


For the peach leaf 

Using Yarn C only. 

1 Moving the cord aside, ss into next dc from prev rnd, ch7. 

2 Starting in 2nd ch from hook, 6dc back down ch, 1ss into the base of the same stitch as ch7, using Yarn C, carrying cord. See below.

3 Make 5dc along the chain, dc3inc in top of chain, 5dc back down other side of ch. (13sts) 

4 2ss into next 2 unworked dc from prev Yarn A rnd. 

5 Crocheting over the top of the cord only, 16dc, ss into next unworked dc from prev Yarn A rnd. 

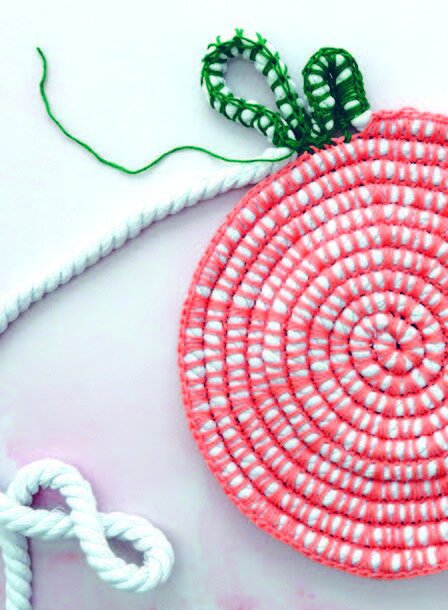
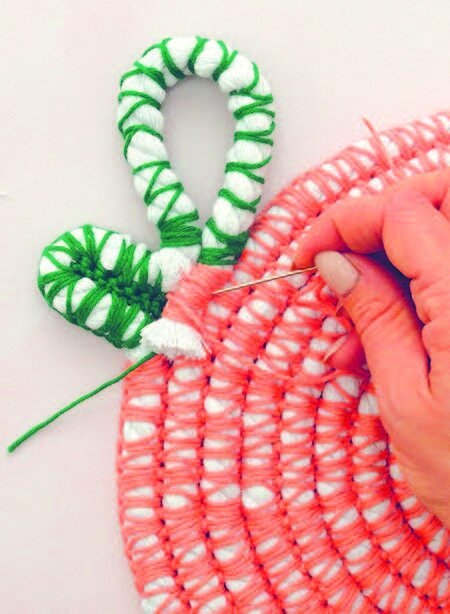
6 Cut and fasten off Yarn C using a ss, leave a 15cm tail. Cut the cord, leaving a 5cm tail. See below.

7 Turn the placemat over and use a yarn needle to sew over the top of the cord end 10-15 times, catching the stitches behind to anchor it down. Fasten off Yarn C and sew in all ends. See below.


For the lemon placemat 

Using Yarn B, carrying cord. Work as for Peach until end of Rnd 4. 

Rnd 5 dc3inc, 18dc, dc3inc, ch2, dc3inc, 18dc, dc3inc, ch2. (60sts) 

Rnd 6 dc3inc, 24dc, dc3inc, ch2 and sk ch2 from prev rnd, dc3inc, 24dc, dc3inc, ch2 and sk ch2 from prev rnd. (72sts) 

Rnd 7 dc3inc, 30dc, dc3inc, ch2 and skip ch2 from prev rnd, dc3inc, 30dc, dc3inc, ch2 and skip ch2 from prev rnd. (84sts) 

Rnd 8 dc3inc, 36dc, dc3inc, ch2 and skip ch2 from prev rnd, dc3inc, 36dc, dc3inc, ch2 and skip ch2 from prev rnd. (96sts) 

Rnd 9 dc3inc, 42dc, dc3inc, ch2 and skip ch2 from prev rnd, dc3inc, 42dc, dc3inc, ch2 and skip ch2 from prev rnd. (108sts) 

Rnd 10 dc3inc, 48dc, dc3inc, ch2 and skip ch2 from prev rnd, dc3inc, 48dc, dc3inc, ch2 and skip ch2 from prev rnd. (120sts) 


For the lemon leaf 

Work as for Peach Leaf. 

Maker’s notes:

The macrame cord is never crocheted with but carried, tapestry crochet style, throughout. 

The placemats are worked in the round in a continuous spiral. Use a stitch marker to mark the last stitch of every round and move it each round to help you keep your place. 

If your placemats start to curl, you are working your stitches too tightly. When you pull up a loop, exaggerate this action to make the loop longer than normal. It should reach up and over the cord, to sit comfortably on top. 

Extracted from Modern Crochet Style by Lindsey Newns (Pen and Sword). Photography: Jesse Wild and Lindsey Newns. Find more patterns, crochet kits and books by Lindsey at lottieandalbert.com

Reader offer

For 20% off the RRP, please use the code CROCHET20 at the checkout on pen-and-sword.co.uk (paperback only, cannot be used in conjunction with other offers). 

Buy this month's The Simple Things - buy, download or subscribe
More things to stitch…

Featured
Mending.jpeg
Mar 20, 2025
Project | Satin Stitch Patching
Mar 20, 2025
Mar 20, 2025
Lavender eye pillow.jpg
Jul 22, 2023
Make | A Soothing Lavender Eye Pillow
Jul 22, 2023
Jul 22, 2023
SIM65.MAKES_Step 7 Finished 3.png
Nov 21, 2017
Make | Craft your own countdown
Nov 21, 2017
Nov 21, 2017

More from our blog…

Featured
Broad beans.jpeg
May 10, 2025
Recipe | Spring Beans on Toast
May 10, 2025
May 10, 2025
saad-chaudhry-7vyTHevoeJM-unsplash.jpeg
May 8, 2025
Sponsored Post | Holidays with Peace of Mind
May 8, 2025
May 8, 2025
Guernsey The Grandmother, a neolithic statue at St Martins church, is often bedecked with floral tributes..jpeg
May 6, 2025
Folklore | Guernsey Superstitions
May 6, 2025
May 6, 2025
In Making Tags issue 131, crochet, weekend project, makes
Comment

Photography by Ilya Sobtchak

Make | a Hand-Dyed Fresh Leaf Indigo Scarf

Iona Bower April 1, 2023

Make this pretty scarf using natural ingredients and a bit of elbow grease

In our March issue, we met Liza and Luisa of Indigo Garden London, who told us all about growing and using indigo and shared this weekend project with us.

You will need:

Tops of 10–15 indigo plants
Metal bowl
1–2 tsp salt
Rubber gloves
Silk scarf

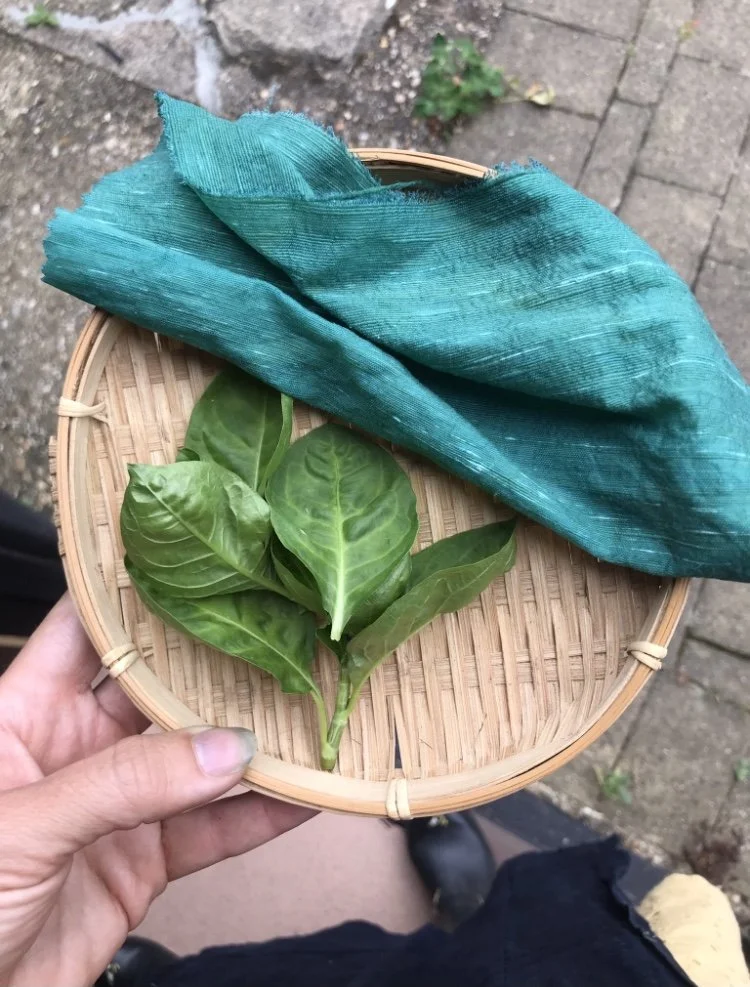
1 The easiest and most direct plant-to-fibre method for dyeing with indigo is to pick the tops of 10–15 indigo plants and give them a rinse. If you want to be a purist, you can wake at sunrise and pick while still fresh from the morning dew, as this is when they have the highest indigo content.

2 Remove the stalks from your plants so you’re left with just the leaves.

3 Place your leaves in a non-reactive bowl and sprinkle on the salt. Put your rubber gloves on to protect your hands from the dye and start to mash the leaves with your hands to break down the plant matter.

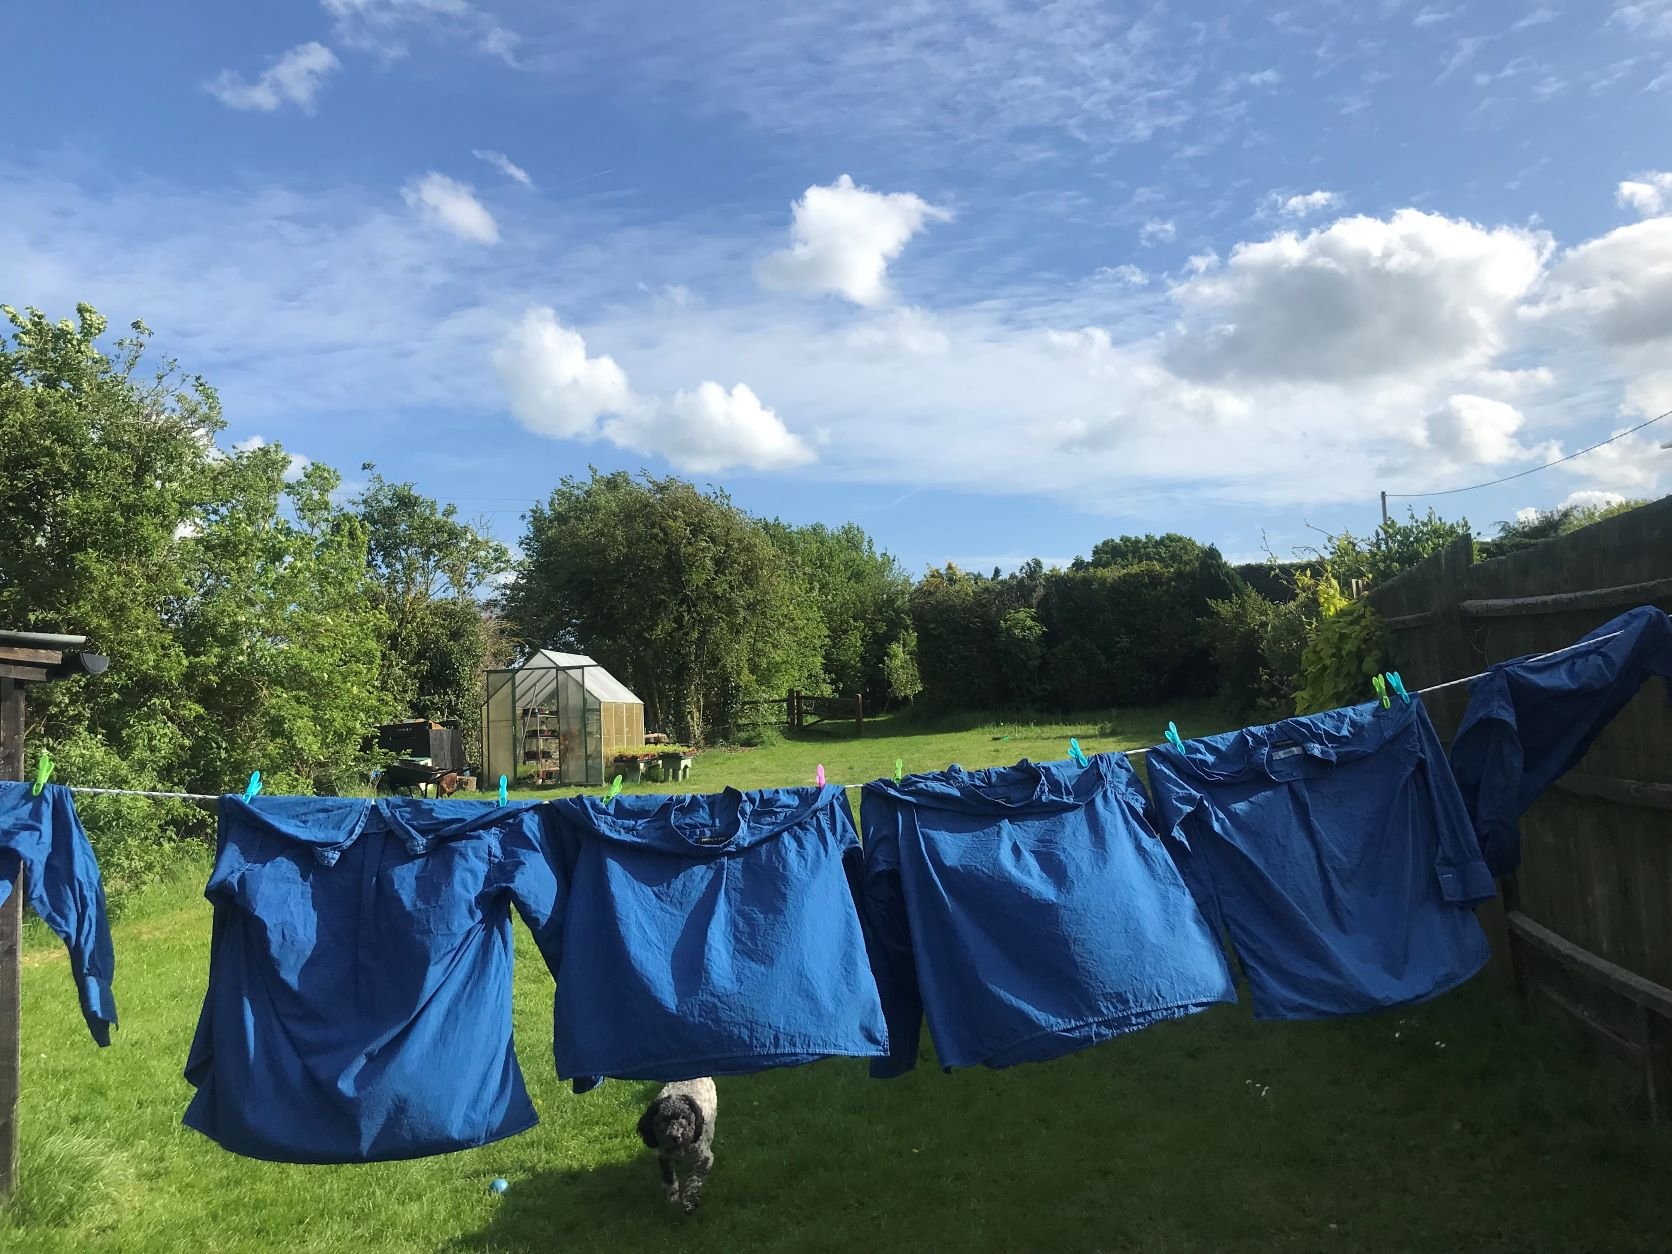
4 The plants will start to look like wilted spinach and some indigo juice will start to form in your bowl. At this point, add a small, pre-wetted silk scarf (or other protein fibre*) and continue to mash the scarf with the leaves. At first, your scarf will look a greenish colour, but keep pounding and slowly the liquid and your scarf will turn blue – the more you mash, the bluer it will become.

5 Once you’re happy with the colour, give the scarf a gentle rinse in water. No further fixatives are required.

MAKER’S NOTE: To speed up the process, you can half fill a blender with leaves and top up with ice cold water – no salt needed. Blend until blitzed and use immediately. Always use the leaves straight after picking otherwise the fresh enzymes will die and the process won’t work.

Friends Liza Mackenzie and Luisa Uribe founded a garden together in east London where they grow indigo and run workshops teaching others how to extract colour from nature. Follow them on Instagram: @indigo_garden_london. You can read more about Indigo Garden London in our April issue.

Buy this month's The Simple Things - buy, download or subscribe

More projects for weekends…

Featured
LemongrassChickenRedCurryCoconutSauce.jpg
Aug 23, 2023
Recipe | Tandoor Lemon Chicken with Mango & Coriander Salad
Aug 23, 2023
Aug 23, 2023
Folk enamel tumbler.jpg
Aug 5, 2023
Make | Folk art enamelware
Aug 5, 2023
Aug 5, 2023
Lavender eye pillow.jpg
Jul 22, 2023
Make | A Soothing Lavender Eye Pillow
Jul 22, 2023
Jul 22, 2023

More from our April issue…

Featured
Nature Table.jpg
Apr 22, 2023
April | Nature Table
Apr 22, 2023
Apr 22, 2023
Hedgehog pic.jpg
Apr 18, 2023
Nature | Surprising Things About Hedgehogs
Apr 18, 2023
Apr 18, 2023
Radish Slammers.jpg
Apr 15, 2023
Idea | Radish Slammers
Apr 15, 2023
Apr 15, 2023
In Making Tags issue 130, weekend project, dyeing, make
Comment

Learn something new | Arm Knitting

Iona Bower December 15, 2022

In our January issue, we have the instructions to make this lovely arm-knitted blanket. The pattern is by Woolly Mahoosive where you can also buy chunky yarns for arm knitting. Visit woollymahoosive.com. If you’re having trouble getting started, watch this video from Woolly Mahoosive, which should give you a visual idea of how it arm knitting works and help you make sense of it all. You can buy the January issue of The Simple Things in all good shops and supermarkets or from our online store.

In Making Tags issue 127, arm knitting, crafts, crafternoon, knitting
Comment
  • Blog
  • Older
  • Newer
Featured
  Buy ,  download  or  subscribe   See the sample of our latest issue  here   Buy a copy of our latest anthology:  A Year of Celebrations   Buy a copy of  Flourish 2 , our wellbeing bookazine  Listen to  our podcast  - Small Ways to Live Well
Feb 27, 2025
Feb 27, 2025

Buy, download or subscribe

See the sample of our latest issue here

Buy a copy of our latest anthology: A Year of Celebrations

Buy a copy of Flourish 2, our wellbeing bookazine

Listen to our podcast - Small Ways to Live Well

Feb 27, 2025
Join our Newsletter
Name
Email *

We respect your privacy and won't share your data.

email marketing by activecampaign
facebook-unauth twitter pinterest spotify instagram
  • Subscriber Login
  • Stockists
  • Advertise
  • Contact

The Simple Things is published by Iceberg Press

The Simple Things

Taking time to live well

We celebrate slowing down, enjoying what you have, making the most of where you live, enjoying the company of of friends and family, and feeding them well. We like to grow some of our own vegetables, visit local markets, rummage for vintage finds, and decorate our home with the plunder. We love being outdoors and enjoy the satisfaction that comes with a job well done.

facebook-unauth twitter pinterest spotify instagram